Lanterns made from cans. How to make a lantern for home decoration from an ordinary jar
DIY lantern from a jar for the New Year
We will need:
- jar;
- a good wide brush;
- regular PVA glue;
- beautiful napkins;
- a candle-tablet and as decorations it can be ribbons, sparkles, acrylic paints, adhesive sparkles.

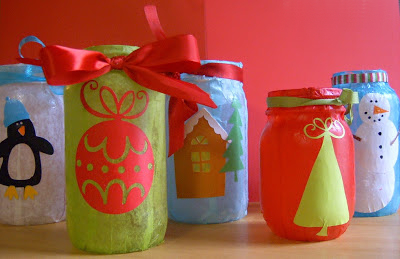
We will look at the simplest option for making a flashlight - simply using napkins and ribbons. The jar must be washed well and wiped dry. After that, we take the ones prepared with any beautiful designs. I chose a New Year's theme - deer and Santa Claus.

Carefully cut out the piece of napkin we need to the size, apply it to the jar and begin applying glue on top of the napkin with a brush. The glue must be applied in a thin layer and very carefully so that the napkin does not tear.


When we have covered the entire jar in this way, we set it for 30-40 minutes so that the glue dries.

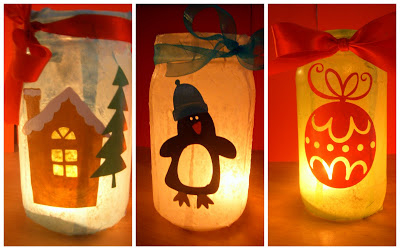
Next, we need to decorate the top. To do this, we take our prepared golden ropes, wrap the jar and, in the same way, carefully coat the ropes with glue with a brush and let them dry. When our flashlight is completely ready, we simply put a tablet candle in it and light it. When several of these lanterns illuminate a room, it turns out very festive and beautiful.


I have shown you the most accessible and simplest way to make a New Year's lantern, but you can experiment with glitter and paints, you can wrap the top of the jar with a longer ribbon and leave part of the tape unglued, then the lantern can be hung. You can make lanterns of different colors and sizes and in the evening, when it is dark outside, light them and enjoy the beauty and anticipation of the New Year.
Often children under a certain age do not want the lights to be turned off when they go to bed. They are more comfortable and calm when the light is on or a small flashlight. However, this is not very good, not only because excess electricity is consumed, but also because babies produce dependence on the light on - they cannot live without it.
Fortunately, there is an interesting solution to this problem, in which the light turns off, but a small “illumination” remains.
We are talking about beautiful decorative lanterns that can be made from “scrap materials”; when the lights are off, they will sparkle like in a fairy tale.
We'll tell you two ways to do this. flashlight. Find a free moment and try it with us!
How to make a flashlight using glow sticks
Many specialized stores sell glow in the dark fluorescent sticks.
Glowing bracelets made from the same elements are also sold; they are used on various holidays.
These are sticks about 20 cm long and 0.5 cm in diameter. They have plastic connectors about 2 cm long.
They come in different colors: red, yellow, green, pink, purple, orange, blue. Sometimes several colors are combined in one stick, this makes the illumination even more original.
For making a flashlight choose your favorite colors, preferably more than two.
Materials
- Glass jars and bottles (whatever you want)
- Latex gloves
- Scissors
- Old tulle
Step 1

Find some glass jars, such as those used for olives and other foods.
Step 2
Cut a piece of old tulle, its length should be greater than the height of the jar. Place it inside the jar so that it touches the glass.
Step 3

Wear gloves to protect your hands and cut the stick to remove the glow paint.
Step 4

Shake the stick with glowing paint inside the jar until so that stains form on the tulle and glass. They will glow in the dark.
Step 5
Since the plan is to get a beautiful multi-colored flashlight, cut a stick of a different color and do the same as in the previous step.
Step 6
Close the lid of the jar well and shake it.
Step 7

Turn off the lights and enjoy the wonderful illumination.
How to make a flashlight using glow paint
For such a flashlight you need luminous fluorescent paint; you can buy it at an artist store.
This is a paint based on phosphor - a phosphorescent pigment that can accumulate light energy with a long afterglow period.
Depending on the pigment used, it may glow greenish, blue, yellow or pink.
As in the previous case, we suggest mixing two or three colors, then the flashlight will be more beautiful.
Materials
- Glass jars or bottles
- Fluorescent paint
- Brush
- Water for paints (as needed)
Step 1

Mix fluorescent paint with a small amount of water in a clean container. so that the paint particles dissolve little by little.
For protection, use a brush and gloves.
Step 2
Wash and dry the jars well.
Step 3

Using a brush, apply paint to the inside of the can. draw a lot of dots there. The more dots there are, the better this flashlight will glow in the dark.
This process will take some time, but you will really like the result.
Step 4

Hold this flashlight next to the switched on light bulb for a few minutes, then it will glow brighter when you turn off the light.
Although the flashlight will not be very noticeable during the day, you will really like how it glows in the dark.

Interesting idea, isn't it? As you can see, making such lanterns is not difficult, and the result is impressive.
It just takes a little time and creativity . You can make lanterns together with, they will really like this activity.
In this case, everyone should wear gloves, and it is better to wear old clothes so that possible splashes of luminous paint do not cause much damage.
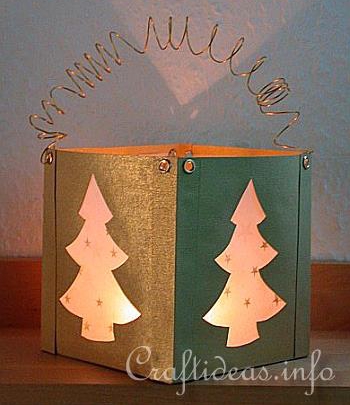
In this master class we invite you to make an original flashlight based on the tale of Peter Pan. The result of the work will be a beautiful lamp in which the fairy Tinkerbell will sit. How exactly to make it, and what you will need for this, see the step-by-step instructions.
Materials
To make a magic lantern from a jar, prepare:
- glass jar with a lid;
- tracing paper;
- PVA glue;
- brush;
- ruler;
- pencil;
- scissors;
- colored paper;
- thick black paper;
- decorative key;
- golden twine;
- wire;
- light source, preferably LED;
- dry glitter;
- scissors.

Step 1. Take a glass jar suitable for this project. Small barrel-shaped products look best. Wash it thoroughly and be sure to remove the label. Dry the container well and then degrease its outer surface with alcohol.
Step 2. Take tracing paper and flatten it. To implement the idea, you need tracing paper. This is thin translucent paper, through which the shadow of a fairy fairy will be visible.
Step 3. Mix the glue with a few drops of water and apply it to the surface of the jar with a brush. Wrap the jar in tracing paper. Press it down carefully. Leave the remaining paper creases. They will look impressive.


Leave the workpiece until completely dry. 4 - 5 hours will be enough.

Step 4. Transfer the outline image of the fairy onto a sheet of thick black paper. Cut it out and glue it to the inside of the can. Leave the product to dry.


Step 5. Decorate the jar at the neck to make it look more impressive. In this case, golden-colored rope, golden-colored wire, and a small decorative key were used.


Step 6. Take colored plain or corrugated paper. Cut a strip 30 cm long and 6 cm wide from it. Draw the outlines of the petals on it with a pencil and also cut them out. Roll up the strip, simultaneously lubricating the paper base of the flower with PVA glue. At the end of the process, use scissors to bend the petals in the desired direction.

Step 7. Glue the finished flower to the neck of the jar.

Step 8. Decorate the jar with dry glitter. Lubricate it at the top with PVA glue and then sprinkle with glitter. Don't pour it in too much.

Step 9. Place a small battery-powered LED light source inside the jar. This could be a small spotlight, a miniature tablet flashlight, etc.
Girls, look what beauty you can make from a mason jar!
I came up with such an interesting little thing from a simple coffee jar. It is quite universal. Do you want it to be a stained glass lantern... Or do you want it to be a vase!
I'll tell you how to make such a flashlight.
So, we will need:
- coffee jar
- masking tape
- black acrylic paint (car paint in a can)
- stained glass paints (water-based “Gamma” is suitable for beginners)
- contours on glass (black and gold)
- paper template for drawing
- wire
- tin can lid
- scissors
The jar was washed from the labels and degreased.

On those areas that we are not going to paint over, we stick a self-adhesive film (for me it’s oracal). You can use masking tape.

We cover our jar with black spray paint. Let it dry for about 30-40 minutes.

Has it dried out? Carefully peel off the film. We don't need her now. Our jar is shaped like an antique lantern. This is the image we will start from.

Using a black outline with dots, we mask the uneven torn edges.

Since this will be a lantern, let’s draw a light for it on paper.

We insert our sketch inside and secure it with tape. Draw a flame with a golden outline. And so on from all four sides.

This is what happened. Let the outline dry. One hour is enough.

We paint our light with stained glass paints. From all sides. But! Each side must be completely dry! At least a couple of hours in the horizontal plane. Only then start painting the next one.

Result (all 4 faces are colored):

I made the handle for the flashlight from copper wire. I just intertwined two wires with each other.

Our "handle". Maybe someone will come up with a more interesting design. This is what I got).

Around the neck of the jar we make the same intertwined rim, fasten our handle and paint it with the same black spray paint. In this case, you definitely need to cover the jar itself with something so that the paint only gets on the neck and the handle itself.

And here it is - our flashlight!


Fire of my soul))

To install the candle, I suggest the following design. It will be clearly fixed in the jar and it will be convenient to light a candle in it.
So, take a tin lid from a tin can and make several cuts.


We bend the edges.

We insert the candle - it works!)

We punch holes in two places and stretch copper wire through them. We bend the edges so as not to scratch the edges of our flashlight.

Another perspective to make it clearer:

Now comes the fun part! Light a candle and insert it inside the flashlight. The fastening antennae are just fixed on the neck of the jar (by the way, I also painted them with black paint).

And we admire it!))


Can also be used as a vase - also beautiful!

Or you can do that... But it’s still better as a flashlight, isn’t it?))))))

Yes, by the way, to protect the bottom of our flashlight, you can glue a circle of velvet cardboard.

Have a creative mood!
Option 1.
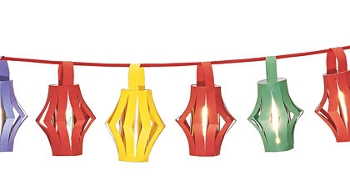
The easiest way to make a New Year's paper lantern is as follows.
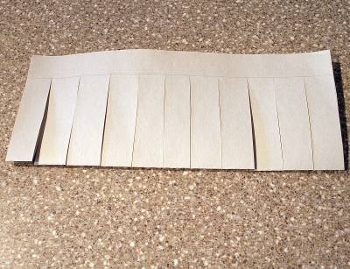
Cut colored paper or old postcards into strips of the same width (for example, 2 cm) but different lengths. You should get one central shortest strip, the remaining strips should be in pairs, each pair a few centimeters longer than the previous one.
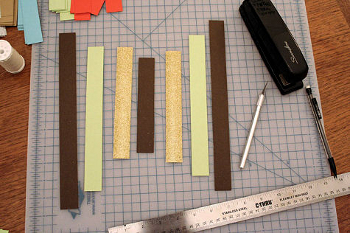
Place the strips together in the correct order, aligning them at one end, and then secure them with a stapler or glue. After this, align the strips at the opposite end and also fasten them with a stapler or glue. The flashlight is ready!
Option 2.
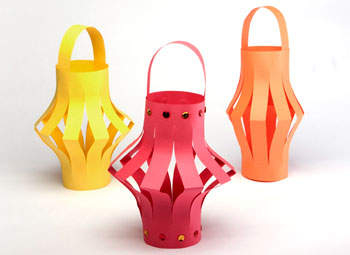
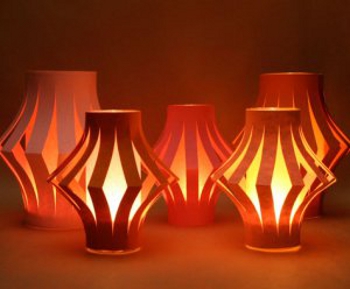
One of the most popular Christmas decorations is New Year's lanterns.
They are very easy to make, and thanks to their spectacular shape, the lanterns will become a real decoration for the New Year tree.
But that is not all. You can make a core for a flashlight. To do this, we glue a tube from thicker paper, but with a smaller diameter.
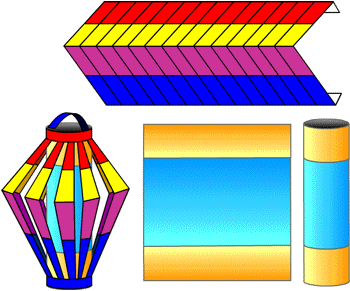
We connect the two parts together (we place the core inside the flashlight) using glue or a stapler. The flashlight is ready.
Paper lanterns can be used in a variety of ways.
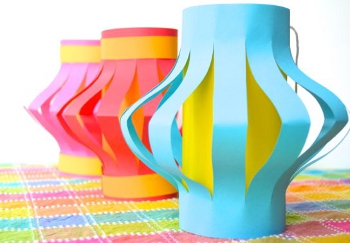
And just like a Christmas tree decoration. And as a design for a small vase or glass (only in this case there is no need to make a “core” for a flashlight).
And several New Year's lanterns suspended on a ribbon or serpentine will turn into a multi-colored garland.
You can insert a candle inside the New Year's lantern. It is better to use safe LED candles. If you are using a regular candle, be sure to place it in a glass cup for safety reasons.
See link >>>>
Option 3.
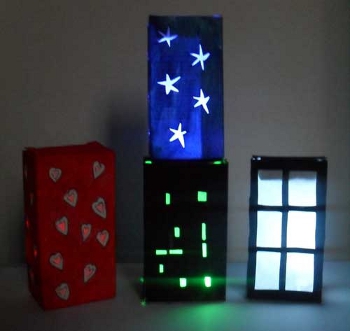
A cardboard box of juice or milk is a wonderful material for making a New Year's lantern. The easiest way to make this New Year's toy with your own hands is as follows:
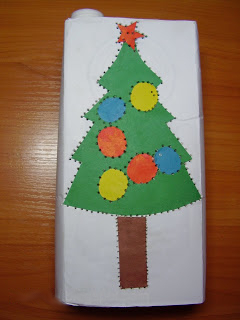
1. Take a juice or milk box, cut off the bottom, and cover it with white paper.
2. Make a New Year's themed applique on both sides of the package.
3. Now the adult must make holes with an awl along the contour of the drawing.
If you place such a box on a flashlight or LED candle, the design will glow in the dark. Link >>>>

Attention! If you are using a regular candle, be sure to place it in a glass cup for safety reasons.
You can also make this DIY New Year's craft from a regular paper bag.
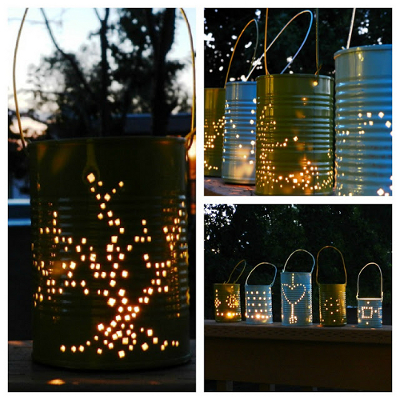
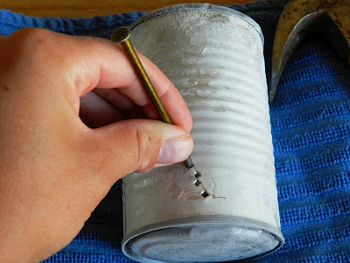
or a tin can.
Holes in a tin can will have to be made using a sharp nail and a hammer. Helpful advice: to prevent the tin from becoming warped when making holes in it, first pour water into it and freeze it in the refrigerator.
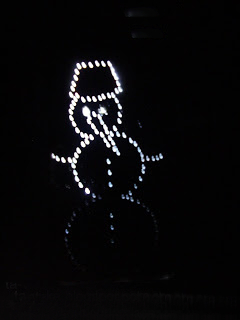
Home is a symbol of comfort, warmth, family hearth. That's why on frosty, winter days, a New Year's lantern in the form of a paper house will look most appropriate.
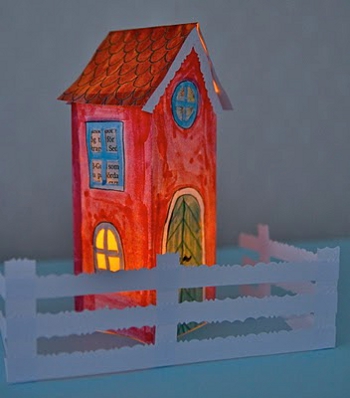
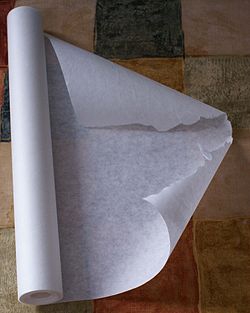
It's very easy to make a house from a juice or milk carton. Just be sure to cover the windows with parchment (wax) paper. We already wrote about this a little higher.
We suggest you use ready-made templates for making three magnificent paper houses as in the photo below.

To make one house, you need to print the same template twice. Each house consists of two identical halves (front and back), connected to each other at the sides.
Cut out the templates; to do this, cut off everything marked in gray.
Cut out the windows. Seal them on the back with parchment paper.
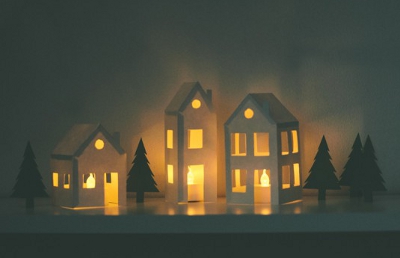
Connect the two parts of the house together. Place the house on a light source (LED or real candle). Attention! If you are using real candles, be sure to place them in a glass container for safety. For a detailed New Year's master class, see the link >>>>
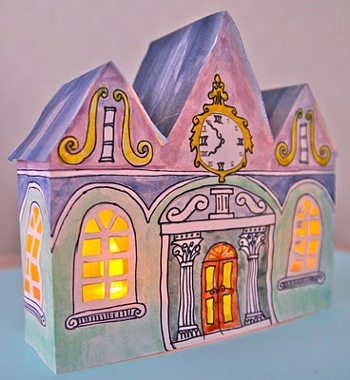
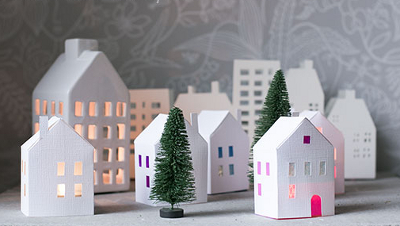
If you liked New Year's lanterns in the form of houses, then there are a few more templates especially for you.
Option 5.
A New Year's lantern can be made not only in the shape of a house. You can simply make holes in a homemade cardboard box and seal them with parchment.
The lantern will be decorated with a New Year's applique.
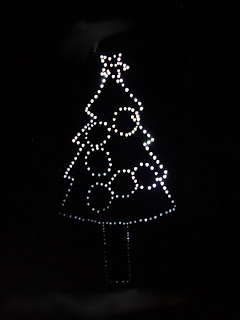
For detailed instructions on how to make New Year's lanterns with Christmas trees as in the photo above, read the links:
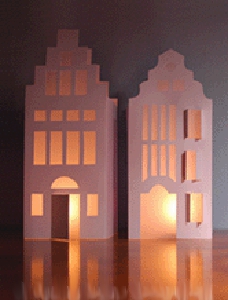
New Year's lanterns of the same shape as in the photo below look impressive.

To make such a New Year's lantern out of paper with your own hands, use a ready-made template.
Decorate the finished flashlight with purchased stickers.
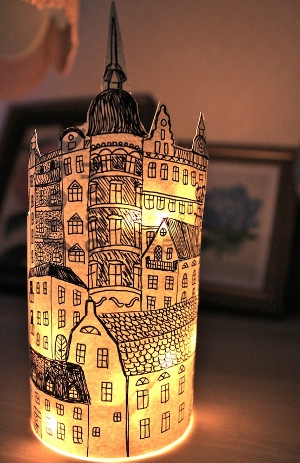
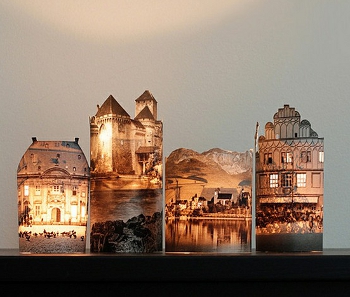
You can use a photograph of the castle, cut out along the contour. For detailed instructions on how to make such original lanterns, see.
Option 8.
You can also paste silhouettes of some images cut out of black paper onto parchment paper. See link >>>>
Option 9.
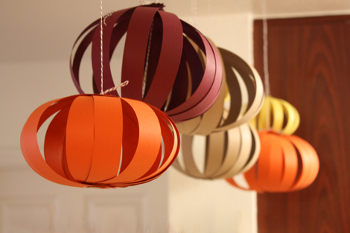
To make these wonderful New Year's lanterns, you will need to cut colored paper into strips of the same length and width. The length and width of the strips depends on the size of the lantern you want to make. To make one paper lantern you will need an average of 14-16 strips of paper.

Stack the paper strips together and use an awl to make a hole at one end and the other. Pass the thread through one of the holes, secure the end of the thread with tape, glue or a sticker.

Thread the thread through the second hole.
Pull the thread so that the strips of paper bend. Tie the thread in a knot. The knot should be large enough so that it cannot slip through the holes in the paper strips.
Flatten the strips to form a ball shape. The flashlight is ready.

All that was left was to find a place to hang it.
Option 10.
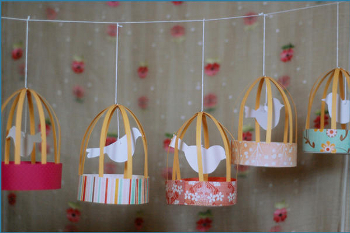
We invite you and your child to make an original paper lantern in the shape of a bird in a cage. To make this Christmas tree decoration you will need:
Colored paper and cardboard
- awl
- scissors
- double-sided tape or glue

- plastic cover
Work plan:
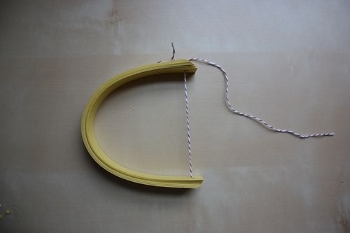
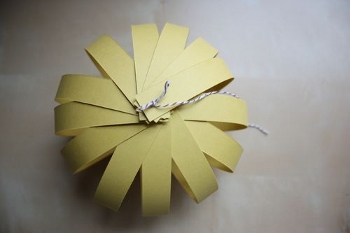
a. Cut colored paper into strips of the same length and width (for example, 1.5 cm - width, 30 cm - length). To make one lantern you will need 4 strips of paper.

b. Use an awl to make a small hole in the center of each strip.
c. Print out the bird on high-density paper (download).
Cut it out. Use an awl to make a small hole in the center of the bird's back.
d. Pass a thread through it, tie the end of the thread with a knot. Make a second knot about 4 cm from the bird.

e. Now you need to thread the paper strips onto the thread. Slide the strips along the thread to the top knot.
f. Tie another knot on top of the paper strips, onto which you can put a bead for beauty.

g. Now take the plastic cover and place double sided tape around it.
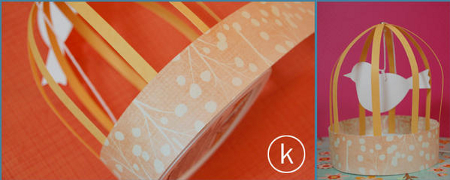

h,i,j. Spread the strips apart and symmetrically attach their ends to the lid.
k. Cut a strip of colored paper and glue it around the lid. The New Year's lantern is ready!
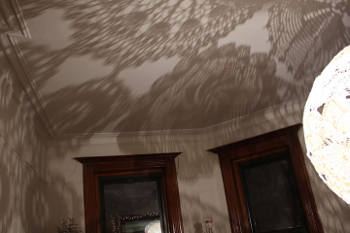
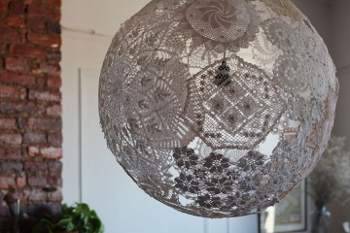
The technique for making it is similar to creating balls from threads, only lace is used instead of yarn. How to make a ball of thread, see the link >>>>
To make a lamp from lace, you need to find a large-volume ball, inflate it and hang it on a thread. Soak the laces thoroughly in wallpaper glue and stick them onto the ball so that they intersect and overlap each other. Let it dry thoroughly overnight, then pierce the balloon, deflate it and remove it. We insert a small light bulb into the resulting lampshade and hang it. That's all, a great DIY New Year's decoration for your home is ready! Read the detailed New Year's master class at the link