How to make Christmas tree decorations your own. New Year's toys for the Christmas tree from scrap materials
New Year is a time of fairy tales and miracles. On the eve of the holiday, even desperate skeptics become inspired and strive to create miracles themselves. Where, in what direction should you direct the flow of your unrealized energy? On the eve of the holiday, you can think about decorating the Christmas tree and making New Year's decorations for the tree yourself. In addition to decorative functions, toys made for the New Year can be given to loved ones, relatives, colleagues, and friends. This small sign of attention will be very pleasant for them!
The manufacturing process is not only interesting and fun, but also extremely economical for the family budget. Such things are significantly different from store-bought ones, because a piece of soul and love is invested in them.
Ready-made Christmas decorations fill the shelves of all stores and souvenir shops. These are traditional stamped plastic beads and balls that are not capable of causing admiration and delight. As for unique, divinely beautiful handmade toys, they are quite expensive. But such products radiate real warmth! Thanks to the step-by-step MKs that I have collected in this article, you can quickly and easily make toys for the New Year tree.
DIY Christmas toys for the Christmas tree 2019
The symbol of the New Year 2019 will be the Earthy Yellow Pig. Oddly enough, but from the color range it is worth giving preference to yellow. The following shades are also perfect:
- grey;
- beige;
- brown;
- terracotta.
It is interesting that the circular annual cycle ends on the Pig, if you follow the Eastern calendar. In this case, all celebrations must be held at the highest level, and decorations and toys are no less important.
If the proposed colors seem boring and gloomy, you can use the following shades for toys:
- green;
- red;
- silver;
- blue and blue;
- white;
- golden.
Advice! It is advisable to avoid black and dark blue colors.
The main attribute of the New Year holidays is the Christmas tree - a lush, bright beauty. Homemade toys will look especially beautiful on its fluffy branches. You can make toys from any available materials: foil and paper, pompoms, puff pastry and pasta, ribbons and cotton wool, felt, coffee beans and acorn caps.
Master class on making pasta decorations:
 You can use pasta to make this cute little angel for your Christmas tree.
 Not many people are able to master artistic modeling. That is why, in order to decorate the Christmas tree in a non-standard way, you can build a toy using pasta. Absolutely anything will do – stars, shells, horns, bows.

- glue or glue gun;
- pasta;
- newspaper;
- acrylic paints;
- dense thread and decor.
Cover the work surface with paper to prevent it from getting dirty or damaged. According to the scheme you came up with, glue the pasta together. You can make various figures, angels, and snowflakes from them. When the parts are dry, you need to apply paint. A great idea would be to use bright shades with a pearlescent sheen.

Leave the products for 2 - 3 hours, then you can decorate them with beads, beads, and sprinkle them with sparkles. In order for the structure to be secured to the tree, you will have to make a loop of thread and attach it to the top.
How to make a New Year's toy pig from cotton wool
New Year is a wonderful, magical holiday. To attract good luck next year and please its owner, you can make New Year's toys in the shape of a pig with your own hands, using hand-made materials.

A great idea would be to make a soft toy from cotton wool. It will take a little effort and patience, but the results will be worth it. This toy will be a great gift for friends, family and colleagues.
For crafts you will need:
- a piece of fabric;
- pattern;
- cotton wool or synthetic winterizer;
- needle, buttons;
- marker (chalk or pencil);
- scissors and thread.

If it is not possible to use a sewing machine, all sewing work is done by hand, which is not at all difficult and interesting.
You will need to print the pattern. Cut all the details with scissors according to the proposed blanks. Make a translation of the material. As for the stitches, when sewing they need to be done only from the inside out. Sew all parts together right sides together. The finished product must be turned out and stuffed with cotton wool.

During the work process, it is important to remember about the free holes; through them, the model is stuffed with cotton wool or synthetic padding. The holes are then sewn up with a blind stitch. The threads must match the color of the material.
These pigs will look very cute!
Making a New Year's toy with the children for the Christmas tree 2019
To make a toy it is not necessary to use new things. You can use textile waste. They are in every home. An excellent option is terry socks
List of required components:
- socks – 2 pcs.;
- small buttons for eyes – 2 pcs.;
- needle, thread;
- for stuffing - cotton wool, padding polyester;
- medium buttons – 2 pcs.;
- chalk and scissors.
The whole family with children can make homemade toys; they will find it very fun and interesting.
These cute piglets can be made literally in one evening.

Work on the toy begins with stuffing it with filler. It is advisable to take padding polyester. It's much easier and faster to work with.


Fill tightly enough so that the product is stable and holds the desired shape. Having reached the heel area, stop the stuffing process. Give the body an oval shape.
As for the unfilled sock, it is cut off with scissors.


The resulting hole is tightened with thread. The needle and thread are threaded from the inside out, it should come out. Walk along the perimeter of the folded edge of the hole with a running stitch, and then pull it off.
Put the cut part of the product on the body. It is important that the elastic frames the edge that is not darned. This is what will be the head.
If the sock is too long, the excess is cut off and the hole is tightened according to the previous scheme. Given the fact that the elastic can move when tightened, the child will need the help of an adult.


A future piglet cannot do without cute ears. They can be made from a second sock, namely from its elastic band.
Cut it carefully using scissors. Then cut in half crosswise. Turn it inside out to use chalk to mark the places for stitching, drawing an eyelet. Sew along the marked line, but do not touch the bottom of the elastic. Turn the ears through the hole. It is important that the stitching remains inside.


If the elastic band is too thin, the part will not hold the desired shape. Solving this problem is very simple. To do this, a layer of thick paper or filler is placed inside the ear.
Then the parts are sewn to the body. In this case, it is advisable to use a hidden seam. Attach the front part first, and then the back.

The family toy is almost ready for the upcoming New Year. The only thing left to do is to sew on the buttons for the heels and eyes. To do everything clearly and correctly, mark the required areas with chalk.
Paper New Year toys - a simple master class
The most popular Christmas tree decoration is a ball - glass, paper, plastic. Despite the fact that you can buy it in any store, it is much more interesting to make it with your own hands with your family.
To make the product durable and keep its shape, it is advisable to use thick paper. Unnecessary postcards, colored cardboard, and magazine covers will do. Unique, exclusive balls will give the room an atmosphere of celebration, happiness, a winter fairy tale and a miracle.

List of necessary supplies for crafts:
- PVA glue;
- cardboard, magazine cover, old and unwanted postcards;
- thick paper;
- scissors;
- compass.
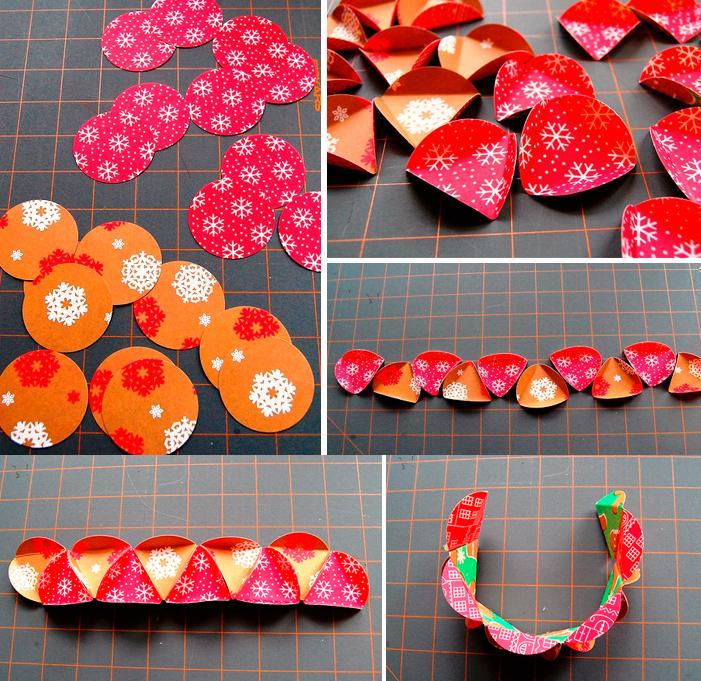
Place the cardboard on a flat surface, use a compass to make 21 circles of the same size, then cut out. Method for processing circles: bend them in half twice on both sides, then straighten them out. This is necessary in order to outline the center.
After this you need to bend one side. Make sure that the edge of the circle is located directly in the center. Fold the two sides twice to form a triangle.
Cut out one such triangle. It will become a stencil for the remaining copies. The next thing you need to do is apply it to the circles, trace and bend.
Take 10 prepared mugs. They need to be glued in stripes, namely five down and five up. The strip is glued into a ring. This will be the basis of the future toy.
Divide the remaining circles into five and glue them together. You will get two lids. They are glued to the base. Attach a loop to the toy, by which it can be hung from the Christmas tree.

Stylish DIY felt toys for the New Year (with patterns)
Christmas tree decorations made from felt will always be in fashion. They are truly homely and warm. This is a great gift on the eve of the holidays.
To make toys, you will need the following available materials: scissors, multi-colored felt, glue, bright floss, various decorations (beads, rhinestones and sequins, buttons, beads), pins, cardboard, synthetic padding.

Step-by-step master class:
- Print pattern 0 snowflakes template. Then prepare paper blanks. Considering the fact that paper quickly becomes unusable, it is better to use thick cardboard.
- Transfer the snowflake pattern onto felt pieces. Cut with scissors. Crafts will be more beautiful if you use pencil strokes to imitate frost patterns. Embroider the resulting outlines with contrasting threads. As for decoration, you can use small beads, rhinestones and sequins, glued to felt. Leave for a while until everything dries.
- Sew two parts of snowflakes. The toy will turn out to be voluminous if filled with cotton wool or padding polyester.
- Make loops from floss, yarn will do. Place the tail of the thread in the corner of the snowflake, make a loop and sew it up.
The finished toys will decorate not only the New Year tree, but also the cornice. You will get a whole garland for decorating a room if you place snowflakes on a string.

New Year's toys made of cotton wool
Children will especially enjoy the process of making New Year's toys. Another interesting thing is that it does not require large expenses. It is enough to prepare a little cotton wool and some improvised elements to make a New Year's lamb. This:
- starch;
- empty chicken egg;
- roll of cotton wool, disks;
- water;
- cardboard or paint;
- toothpicks, PVA glue;
- syringe;
- plastic or wooden board.
Algorithm of actions:
You need to cook the paste in advance. To do this, you need to dissolve 1 tablespoon of starch in a small volume of cold water. Bring 250 milliliters of water to a boil. Reduce heat level and pour in starch mixture. Do this slowly, stirring constantly so that no lumps appear. Bring to a boil and remove from stove.

Cool the resulting mixture and get to work:
- Prepare a chicken egg. This will be the body of the future toy. Use a syringe needle to make a small hole in the bottom of the shell and draw out all the liquid. Pour water into it in the same way and rinse, repeat the manipulation several times. The result will be a hollow, perfectly clean shell without any foreign odor.
- Vata is divided into several parts: for the head, torso and legs. The dimensions must match the egg. As for wool. It needs to be made from cotton wool, rolled into small balls. The diameter of each is no more than one and a half centimeters.
- The balls are moistened in the prepared paste. To avoid getting dirty, they are placed on toothpicks and then placed on a board to dry.
- Make two holes in the side of the egg at a distance of 2 cm from each other. Insert the thread into them using a needle. Spread half an egg with paste and glue cotton wool to it. Do similar actions with the second part. You will get a ball of cotton wool with two threads sticking out of it.

Stages of work:
- In just 30 minutes, the cotton wool will dry and take the desired shape. Roll out several prepared balls into legs. They should take on a cone shape.
- Cut two centimeter ovals from a cotton pad - these are blanks for the ears. Using PVA glue, glue the sheep to the head.
- Then paint the legs and head using black paint. It is advisable to use thick gouache or acrylic. If you don’t want to mess around with paint, you can cut out the parts from black cardboard. You can make eyes out of it.
- After the head has dried, you can begin assembling the toy. This is the most critical stage. Using PVA glue, glue the head and legs. Then the wool, starting from the back.

The result will be such a cute and funny sheep. Make a loop from the threads sticking out on the back, tying them together. A unique cotton toy can decorate any New Year tree.
DIY paper Christmas tree decorations
Toys based on paper and napkins are incredibly popular. These are various garlands, snowflakes, snowmen, Christmas trees, etc.
The New Year tree will appear in a new look if you decorate it with homemade toys. “Precious stones and crystals” made from paper deserve special attention. All you need to do is print out the ready-made templates, then carefully cut out and glue all the parts.


Before the toy is completely glued together, a loop is attached to the bottom. You can hang a toy from it. Paper jewelry is coated with glitter to give it a magical shine.

You can make a Christmas tree decoration like diamonds from ordinary colored paper. Having a ready-made template at hand makes the job much easier.

Algorithm of actions:
- print the finished template;
- cut with scissors;
- Make a loop out of thread and glue it to the top, which will allow you to hang the decoration on the Christmas tree;
- Next, you need to accurately bend along the indicated lines and glue;
- If desired, cover the surface with glitter.

Homemade Christmas tree decorations are incredibly easy and quick to make. The process helps to unite all family members in one exciting activity.
New Year's toys made from wrapping paper
A wrapped gift will be a rather unusual, bright and even unique decoration for the Christmas tree.

For this you will need:
- glue;
- thick cardboard;
- fishing line;
- decorative tape;
- scissors and ruler;
- wrapping and packaging paper.
Draw a box template on a piece of cardboard. Then it must be cut out and bent along the dotted lines. Carefully form a gift box and glue it together.


Pack the finished box according to the diagram, not forgetting that you need to secure the fishing line and tie a festive ribbon.


DIY Christmas tree decorations made from ribbons
To make an original Christmas tree decoration from satin ribbons, you can bend it to a special patchwork technique called Artichoke. The essence of the technique is sewing and gluing individual elements. To make New Year's balls, you will need polystyrene foam and ribbon.

The first thing you need to do is prepare the basis for the future ball. The best option is a foam blank. It can be purchased at a craft store.

The satin ribbon is cut into strips 2.5 centimeters wide and 7 cm long. Additionally, you will need small sewing pins with heads.
You need to cut out a square and pin it to the ball with thin pins.

Then the prepared strip is taken. It must be folded into a triangle. Also attach the finished part to the square. It is important that the needles are located in the bends of the ribbon, namely its lower corners. Triangles are attached to the four sides of the square.

Having completed the described actions with the first row, you can safely switch to the second. It is worth considering that the blanks will be attached in a checkerboard pattern.

To make the craft look colorful and attractive, you can combine different colors to suit your own taste. Attach the pieces to the foam ball until the entire area down to the bottom is covered.
We will send the material to you by e-mail
The time has come to actively prepare for the New Year: while there is still a lot of time left before it, it is worth taking advantage of such a valuable resource and making New Year's toys with your own hands from paper and more. The editors of the site undertake to help you with this, as they are also preparing their houses and apartments for the New Year.
Let's start making New Year's paper toys with our own hands: options for holiday decorations
It’s amazing that a great variety of different decorations can be made from paper, in addition to the well-known lanterns, garlands and snowflakes. Let's understand the beauty of paper and try to make a New Year's toy with our own hands using photos from the master classes.

Beautiful figurines of Santa Claus and Snow Maiden are made from paper, even pigs as a symbol of the coming year look great as a Christmas tree. We study tips for making various decorations for the Christmas tree and try to put them into practice!
Cute Santa Claus
One of children's favorite hand-made New Year's toys will be the wonderful Santa Claus. This come to life fairy-tale character from a childhood dream will find the most prominent place on the Christmas tree.


Related article:
DIY origami for the New Year: postcards, classic and modular origami, Santa Claus and Snow Maiden, origami Christmas tree, snowflake, origami star, origami animals - in our publication..
Snowman without snow
The snowman is also a traditional winter symbol that children will enjoy making with their own hands. There are several ways to make a small beautiful snowman.


Angels in different ways
The cutest do-it-yourself Christmas tree toy is an angel. A Christmas tree decoration like this always lifts your spirits and will serve as decor for the coming Christmas.


Garlands - large-scale apartment decoration
You can make excellent New Year's toys with your own hands together with your children. The process of creating a garland would be such a suitable option.


Related article:
DIY garlands for the New Year: photo. Christmas tree, paper circles, accordion, corrugated garland and origami, garland made of fabric or felt, pine cones and other material, LED garland decor - in our article.
Flower wreaths and more
Christmas wreaths immediately give a festive and solemn mood to anyone who glances at them. They make gorgeous wreaths out of paper too!


Related article:
: history and tradition of origin, master class on creation, what to make the base for the product from (newspaper, cardboard, pipe insulation), decorating a New Year's wreath with various materials - read in the publication.
Stars and snowflakes fall in the apartment directly from the ceiling and walls
The familiar appearance of snowflakes is still popular, but there are other options for making these traditional elements. We also suggest trying to make beautiful paper stars with your own hands. You can make a garland from them, hang them from ceiling beams, a chandelier, glue them to walls and doors, to windows or to a Christmas tree.


Related article:
: the art of quilling and the beauty of paper strips. Stencils for New Year's snowflakes, modular origami, geometric shapes, fluffy snowflakes, a star for a paper Christmas tree - in our publication.
Making Christmas balls in different ways
What would we do without the usual Christmas tree balls? Paper also makes its own adjustments to the production of New Year's decor. Let's try to create beautiful balls?


Related article:
corrugated paper, kusudama, origami, paper flowers; New Year's ball made of felt and fabric, decorating a New Year's ball for the Christmas tree using different means - read the publication.
Lanterns for the Christmas tree and more
A flashlight is a universal toy, suitable even as a DIY decoration for a city Christmas tree. There is also always a place in the apartment where a New Year's lantern is clearly missing.


How to make your own New Year's toy from yarn, ribbons, beads, felt and pine cones
In addition to paper, you should try using different materials to make New Year's decorations. Interesting and beautiful works are made from natural materials, easy-to-handle felt, and beautiful yarn. Acrylic paints, hot glue and PVA glue, glitter and any decorative elements help in the work.
DIY Christmas tree decorations: new life for grandma’s yarn
Any dense thread can be turned into voluminous or flat original decorations for the holiday, which are so good that they keep their shape for many years.


Video: example of a thread toy for the New Year
Making a New Year's toy from ribbons, beads, sequins
A bag of sequins or beads is inexpensive. They decorate any surface or use them as decorative elements for finished products. Glue the decoration with hot glue or super-moment.


It’s easy to make even a large Christmas tree toy with your own hands from fabric, ribbons, and beads. They sell ready-made large-sized foam plastic blanks that just need to be decorated.
Felt toys for the New Year
Small and large New Year's toys can be easily made with your own hands from a material such as felt. This is a fascinating process that always has a positive result for both experienced craftsmen and beginners.
You also don’t need to spend a lot of time learning the basics of working with felt: the material is easy to cut, it is not difficult to stitch it by hand or sew it on a machine. The edges are decorated with any types of seams.
More often than not, felt serves as the base on which the decor is placed. Decorative elements are also cut out from felt of a different color, or embroidered on it, and various beautiful decorations are glued on.

Article
Good afternoon! I hasten to please you with New Year's toy ideas, and for those who have not yet made gifts for the New Year, I recommend not to delay this for too long and choose them in this
Tell me, what do you prefer to give for New Year? What about receiving? Probably everyone really likes receiving toys for the Christmas tree, and just all kinds of them. I agree, I remember when I published a post about crafts for the upcoming holidays, so a lot of people sent me wishes and congratulations, so I also want to congratulate everyone on the upcoming holidays!
After writing my last post about New Year’s crafts, I received letters in the mail asking me to publish more options for what can be made from plasticine, and I’m sharing my experiences with you.
She's so beautiful!

Do you like to sculpt Christmas trees and snowmen? Then use these step-by-step instructions with photos:


Where would we be without Santa Claus, children simply love to see him at the holiday, and even more so to make crafts.

These are the kinds of compositions that can come out.

If you want, you can even sculpt Peppa Pig and her brother George from the cartoon.

You can make a dog lying near the Christmas tree, let it bring good luck and warmth to your home and become a talisman.
Such an affectionate and sad puppy girl.

Or playful Tuzik, what do you choose?

I remember once upon a time I had to work in a kindergarten, you understand that kindergartens are almost not funded, so at that time we made and decorated our group from whatever we could, from all sorts of things in general. It was ordinary polystyrene foam or they took cheap ceiling tiles and this is what happened:

Agree, there seems to be nothing difficult, but it also looks original, with a twist.

Toys made from salt dough are a little more complicated and time consuming.


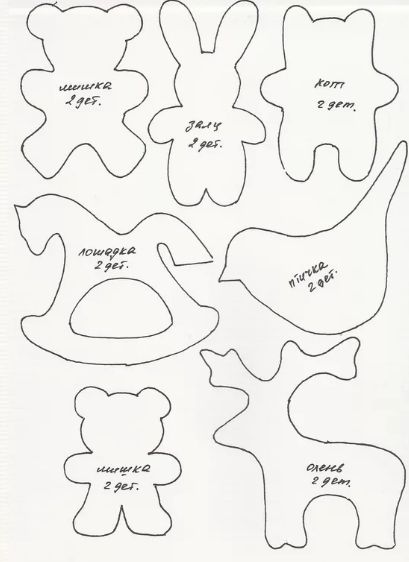
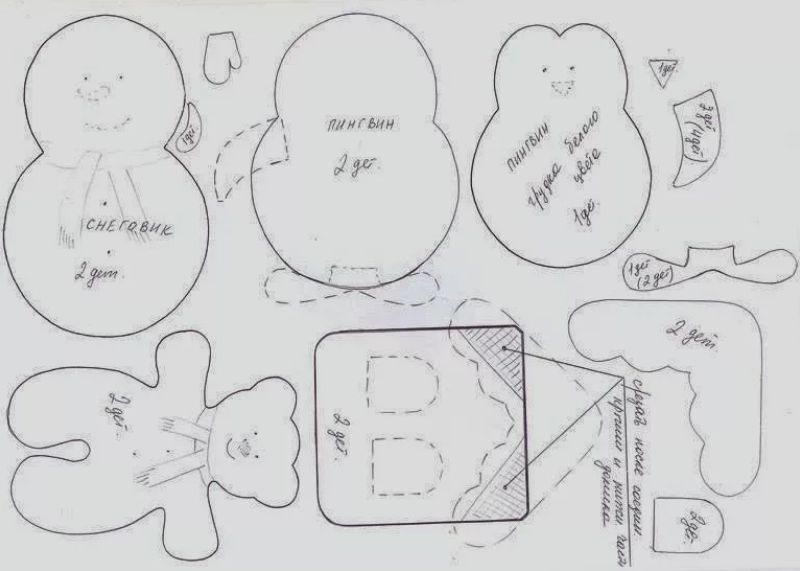
Beautiful felt toys for the New Year tree
Now, as for felt, well, you can create a lot of ideas and find them on the Internet.


Their diagrams and patterns are quite simple, you can easily draw them yourself.
Funny little deer.

The Christmas tree is a forest beauty.

If you are interested in this Christmas tree, or this bookmark for books in the shape of a dog, then write to me below, I will send you templates and a diagram.


Felt Snow Maiden.

How do you like such wonderful creatures, if you decorate a Christmas tree with them, there are enlarged diagrams, they will appear soon in another post, or write to me and I will send them.

By the way, I was so fascinated by the topic of felt that I will soon write a separate article on this topic, so fans, wait, add my blog to bookmarks and rejoice with me))). By the way, if you need crocheted toys, then don’t hesitate to go here, there’s a whole bunch of them
Master class on paper crafts in the form of balls and lanterns
Who doesn't love balloons on the Christmas tree? Probably everyone just loves them, let's make a simple version.
You will need colored or multi-colored paper, scissors and glue. You will need to cut out 20 circles of the same size from it. And then follow this pattern, roll it up as shown in these pictures.

Then, as shown, glue with good glue, it is better to use ericruser or PVA.

There is another option for such a ball for a Christmas tree made of paper.

I’m also giving you the most popular type of balloon decoration, in this video everything is shown in great detail and clearly, you just have to repeat the necessary steps after the leader:
And here’s another super idea, you’ve definitely never seen anything like this before:
For schools and kindergartens I can offer such interesting lanterns that everyone probably knows and remembers.


And another masterpiece in the form of a garland, it is not something unimaginably beautiful. Watch this video from YouTube channel:
Paper toys for the New Year
The first place can rightfully be given to snowflakes of different types and in the origami style and volumetric options, who needs all sorts of ideas and templates, see snowflake patterns here


It is also easy to fold various figures from paper strips.


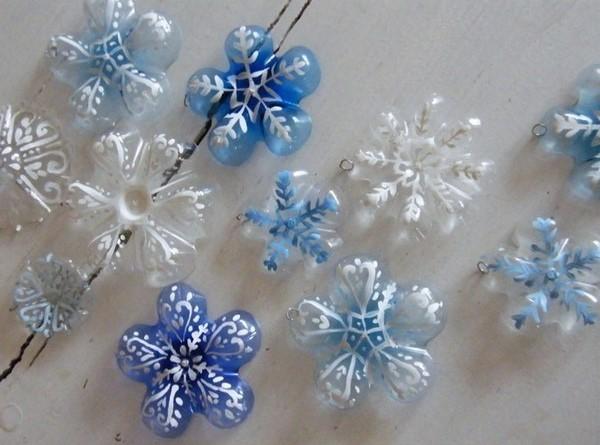
We make Christmas decorations for the Christmas tree with our own hands from plastic bottles and light bulbs
A fairly common craft, a souvenir, and someone will even give such a treasure as a gift, I recommend doing it yourself at home. Just be careful if you make a craft from a light bulb, it’s still not for children’s hands.


Plastic bottles will be safer and more durable.
Hello, dear readers! With the onset of winter, each of us thinks about the approaching New Year, because there is so much to do, from carefully thinking through the holiday menu to decorating the room! Moreover, you can start decorating a house or apartment not in the last days of December, but somewhere in the middle of the month, when you have time to purchase or, even better, make your own Christmas tree decorations! This is actually the issue that today’s review will be devoted to...

10 cool ideas for DIY Christmas tree decorations (video)
DIY Christmas tree decorations.
1. Ballerina made of thick paper.
To make this simple decoration you need to prepare:
✓ Thick paper;
✓ Thin paper;
✓ Scissors;
✓ Ballerina template;
We print out the template of the ballerina we like, cut it out, prepare the tutu (ballerina’s skirt) - when cutting out a simple snowflake, you can use the diagram below, when the snowflake is ready, cut it on one side, try it on the ballerina’s waist and fasten it with glue. Finally, using a needle, we create a puncture on top of the product and thread the fishing line.


2. Unusual DIY Christmas tree decorations made of wire and beads.
To work you will need:
✓ Thick wire;
✓ Thin wire;
✓ Beads, bugles, beads;
✓ Wire cutters.
From thick wire we form the frame of the product (herringbone, heart or star), then we string multi-colored beads, glass beads and beads onto a thin wire, after which we wrap the resulting “garland” around the frame of the product. Finally, the entire product can be additionally wrapped with thin wire without stringed beads.


3. Christmas trees made from twigs.
To work you will need:
✓ Thin dry twigs;
✓ Saw or jigsaw;
✓ Beads;
✓ Acrylic paints and brush.
Using a jigsaw, we cut the branches into pieces of different lengths so that, after assembly, the silhouette of a Christmas tree is formed, then using an awl, we make a hole in the center of each cut branch, after which we string the wooden pieces onto a thin ribbon, not forgetting to thread a bead between each branch. Finally, we paint the resulting Christmas tree decoration with acrylic paint.


4. DIY Christmas tree decorations made from burnt out light bulbs.
Easy way #1. We cover the light bulb with a layer of PVA glue and generously sprinkle the product with glitter, wrap the base of the light bulb with twine, not forgetting to create a hanging rope for the spruce branch. You can complement the product with a small card with New Year’s greetings.
Simple method number 2. Snowman. We cover the light bulb with PVA glue, sprinkle generously with white glitter or semolina mixed with glitter, glue twig hands onto the transparent glue, draw eyes, mouth, buttons with black paint, and orange paint for the nose.


5. Fabric Christmas tree decorations.
On a suitable fabric, using a template (for toys of the same shape and size), draw out a Christmas tree, star, heart or Christmas candy. Then we sew the two fabric sides inside out together, sewing the product by hand or on a sewing machine, turn it inside out, stuff it with cotton wool or padding polyester, sew up the hole and decorate the product with bows, rhinestones, beads or ribbons.


6. Ball of thread.
To work you will need:
✓ Balloon or medical fingertip;
✓ PVA glue;
✓ Plastic cup,
✓ Scissors;
✓ Needle;
✓ Rhinestones.
We take a plastic cup, use a needle at the very bottom (see photo) to make through holes into which we thread the thread, then pour PVA glue into this cup, after which we inflate a balloon or a medical fingertip, tie it so that it does not deflate, and begin to wrap the threads in a mess . We leave it to dry for 24 hours, then carefully pierce the ball with a needle, wait for it to go down, take it out and use transparent moment glue to decorate the product with rhinestones.


7. Christmas tree toy - in the form of a wrapped gift.
✓ Thick cardboard;
✓ Ruler;
✓ Scissors;
✓ Wrapping paper;
✓ Decorative tape;
On a sheet of cardboard we create a template for the future box (see photo), cut it out, bend along the dotted lines, form a box, and glue it together. We take wrapping paper and, according to the diagram presented below, we pack the “gift”, not forgetting to tie a ribbon and secure the fishing line.


8. DIY Christmas tree decorations made from salt dough.
How to make salt dough.
Required ingredients:
✓ Flour - 200 grams;
✓ Salt - 200 grams;
✓ Cold water - 125 milliliters;
✓ Sunflower oil - 5 tablespoons.
Take 1 glass of fine salt, mix thoroughly with 1 glass of flour, add 5 tablespoons of sunflower oil and gradually pour in cold water. Mix the mixture and hide the dough in a plastic bag (so as not to dry out), take the dough from the bag in small parts and make New Year’s Christmas tree decorations...
In general, making a Christmas tree decoration with your own hands from salt dough is not so difficult, let’s take a deer for example, roll out the dough into a thin layer, cut out a deer template from paper (the templates are presented below), apply it to the dough and trace it with a thin toothpick along the marked lines We cut out the product using a thin, pointed knife, and leave the resulting deer to dry in the sun or radiator until completely dry. Sometimes this natural drying process takes several days. When the product is completely dry, paint it silver using a spray can, leave it to dry, and finally cover it with a layer of varnish. You can decorate the deer with a ribbon, a chain around the neck, a rhinestone on the nose and eye.


You can make all kinds of snowmen, snowflakes and stars from puff pastry... By the way, snowflakes and stars, after drying, can be painted with gel pens of a matching color.


DIY Christmas decorations photo
9. Christmas ball made of figured confetti.
To work you will need:
✓ Foam ball;
✓ Pins with beaded caps;
✓ Figured hole punch - flowers, Christmas trees or snowflakes;
We prepare a large number of figured confetti from white thick paper, glue a satin ribbon to the ball, and begin to apply the confetti, simultaneously securing them with pins with beaded caps.


10. Christmas ball made of woolen threads.
To work you will need:
✓ Foam ball;
✓ Transparent adhesive moment;
✓ Thick woolen threads.
We cover the ball in small parts with transparent glue-moment and wrap it in a circle with threads. Finally, we install a bracket on top of the ball into which we thread the fishing line.


11. Ball of paper roses.
To work you should prepare:
✓ Corrugated paper of a suitable color;
✓ Glue gun;
✓ Styrofoam ball.
We cut the corrugated paper into narrow strips, from which we form rose buds (see photo), tie each bud from below with a thread so that it does not unravel. After the required number of flowers is ready, glue the buds using a glue gun to the base of the foam ball, tightly joining each other, leaving no gaps.


12. Foam ball decorated with rhinestones.
In this case, everything is generally simple... We take a foam ball (sold in the “Everything for creativity” departments) and paste it with large and small rhinestones.

13. Christmas trees made from ribbons.
You need to prepare:
✓ A bright ribbon 30 cm long, approximately 1 cm wide.
✓ Beads (round or square);
It is better to start forming a Christmas tree from the bottom, string a bead onto a thread, then thread a ribbon, and so in order, alternating beads and ribbon, we form a Christmas tree (see photo).
 DIY Christmas decorations photo
14. Christmas tree pendants made of cones.
The cones can be painted in a suitable shade from a spray can, and also powdered with glitter (it is better to glue glitter with PVA glue); finally, in the lower and upper parts of the cone, you can attach transparent beads, reminiscent of frozen droplets of water, and instead of thread or fishing line, attach a thin decorative chain.

15. Pasta snowflakes.
We stock up on pasta of various shapes, lay out a snowflake on the table and carefully glue all the parts together with transparent glue, leave the product to dry, spray paint it in a suitable color, tie a ribbon and admire the result. Additionally, you can see photos of pasta snowflakes.

16. Ball of curly pasta.
To work, you need to roll a small ball out of paper, to which you glue the pasta using a glue gun. Finally, the ball can be spray painted.

17. In the form of a house.
Such a cute toy will look great on the Christmas tree. Well, we told you how to make it, which also presents other ideas for paper toys for the Christmas tree.

18. Car.
The pendant turns out to be quite weighty, because construction putty was used for its manufacture. You can find out how to make one from .

19. Mini gift.
This is probably one of the best Christmas tree hanging ideas and is quite easy to make. You will find all the details.

20. Hat made of threads.
It's funny that such a hat is made without any knitting skills. Well, you’ll find out exactly how she makes it by looking.

21. Twine ball.
This decoration is easy to make, but looks beyond all praise; it stands out among other decorations on the Christmas tree. We told you in detail how to make such a ball.

22. Star made from toothpicks.
It's funny that you can make a rather large and interesting Christmas tree decoration from simple toothpicks. All the details .

23. Dress made of paper.
This dress is folded using the origami technique, but we told you exactly how this is done.

24. Felt mittens.
We redraw the mitten templates onto felt fabric and cut them out. For each mitten you will need two blanks; we sew the first two parts together by overcasting. We do the same with the second mitten; if desired, the cuffs can be made of white fabric.


25. Skates made of felt and paper clips.
We redraw the boot template onto felt fabric. For each skate you will need two blanks in the form of a boot; we sew the first two parts together, securing them with an overcast stitch, and sew a paper clip at the bottom. We highlight the lacing area on the skates at the front with contrasting threads. We do the same with the second skate.


26. Match sled.
A very beautiful and most importantly easy to make decoration. How to make these
28. Sweetie.
It looks very beautiful on the Christmas tree and clearly stands out among other decorations. We showed how such a candy is made.

29. Christmas tree made of cardboard and twine.
This decoration can be called one of the simplest in terms of production, but it looks very impressive. Come in and learn how it's done.

30. Birdcage.
Making such a cage is quite time-consuming, but believe me, it’s worth it! We described all the secrets of its creation in.

31. Paper bow.
This decoration can be quickly and easily made using the template you will find.

32. Spring made of wire.
A very interesting decoration, and can be done in literally a matter of minutes. In a previously published review, we tell you.

33. Mini Santa Claus hats.
Believe me, this decoration can draw attention to the Christmas tree. We told you how to sew such cute caps.

We also recommend that you study the following New Year reviews:
Don't have time to make Christmas tree decorations?
Well, what to do if you don’t have time to make Christmas tree decorations? Nowadays, stores present such a wide range of decorative decorations that even the most discerning buyer will find a suitable New Year's item for himself!
Very beautiful and the best decorations for the Christmas tree (video instructions 21 ideas!!!):
DIY Christmas tree decorations (video):
Examples of Christmas tree decorations:
Dear readers, I hope you liked the DIY Christmas tree decorations, I will be happy to read your reviews left in the comments, I also suggest you subscribe to receive news from the “Comfort in the Home” website.

Show hidden content

Hi all! The New Year is getting closer and we will soon be decorating the Christmas tree. As luck would have it, I discovered that at home there was absolutely nothing to decorate the forest beauty with. A dog just appeared in the house and completely chewed everything up. Therefore, this year I decided not to buy, but to make it myself. Plus it's a great activity for kids.
Soon there will be a competition for the best toy in schools and kindergartens. It's time to think and build something. Besides, you don’t need anything special for this. After all, decoration can be made from improvised materials. This is exactly what our topic of today’s article will be about.
Just recently we did , and . It turned out very beautiful. The same will happen with Christmas tree toys. After all, this is not only an interesting activity, but also fun for the whole family. Just imagine how amazed your guests will be when they see all your creations. Somehow I even wanted to celebrate the holiday as soon as possible.
The youngest daughter is already asking how soon we will decorate the house. Can not wait to! And it’s not surprising, now I myself, like a child, make something for New Year’s. I hope you are in the same mood? So let's channel our impatience in the right direction!
We'll start with the simplest one first. You have felt or any other fabric lying around somewhere, great. Prepare it and choose any template you like. You can simply redraw it or print it. Cut out, sew both parts and you're done. For volume, put padding polyester or cotton wool inside and don’t forget about the loop. It is with her help that our toy will stay on the Christmas tree. Let's start with the symbol of the coming year.


Some are light and some are heavier. But both of them turn out simply wonderful.


It turns out it's very simple. The main thing is to cut, and the rest is up to the needle!
How to make Christmas decorations for an outdoor Christmas tree from plastic bottles
Parents don’t really like assignments from teachers or class teachers. But everyone has encountered this. The task is simple: make a toy for the Christmas tree, and not just a simple one, but a street one. You need to decorate the school or garden area with something. Yes, you can transform your yard, it’s so simple. Stock up on plastic bottles of different sizes, glue, paint and something shiny (tinsel, glitter, tape, foil).
How can we live without the symbol of the coming year? We'll definitely do that first.


What about bells and balls? They are easy to make and so beautiful!


There are many options, show your imagination and you will have the best toy.
Christmas tree toys made from scrap materials for children
There is nothing easier than making a toy from what you have. You can just have a light bulb and paints, and you will have a work of art. You just have to think about what you want and you're done! I bring to your attention a sufficient number of options from which you can choose your favorite or do everything. I think your Christmas tree will be the most elegant.


It's simple, now let's make a symbol of the year.
Pig (piggy) for the New Year tree 2019
Whose year is it? Of course, the owner will be a yellow earthen pig (boar). Therefore, in order for everything to be good in the new year, it is necessary to make toys in the form of this animal. The materials at hand will help us with this. There will be both simple and more complex ones.


How to make New Year's toys from paper
These decorations can be made by the whole family. It's always interesting to spend quality time together. After all, you will not only feel good, but also have fun. And children love it very much. As you know, you can make a lot of interesting things from paper. And if it is also shiny, then the toys will be extraordinarily beautiful.
This one will be the simplest. Carry paper of two colors. Cut strips of it 1.5 - 2 cm thick and 10 - 15 cm long. Then fold them in half and glue the edges, and also stick them to each other.
The longer the stripes, the larger the diameter of the decoration.

How do you like this option?


Maybe you have any other ideas? Share with us and our readers in the comments below.
Making paper toys in the shape of a fan
There is nothing simpler than a paper fan. You just need to fold the paper like an accordion and you will get an interesting decoration. This method can be used to make not only a fan, but also other shapes. And which ones you will see below.


There are so many more ideas ahead. Let's definitely look at them.
Video on how to make a New Year's tree toy from beads
I bring to your attention a video. I found it on the Internet. The author makes a wreath of beads in it. You can hang it on a Christmas tree or decorate some furniture in the house. Be sure to take a look. It seems that this is very difficult to do. But in reality everything is simple and fast. To do this you will need green beads, wire of different thicknesses, as well as glue, beads and a small ribbon.
Did you like it. Me and my girls have already decided to make one. Perhaps you will get more than one and different sizes. I think this year's tree will be simply wonderful. And you?
Vintage USSR New Year's toy made of cotton wool
Many people remember those unusually beautiful toys. I had several of them: Santa Claus, Snow Maiden and a snowman. Nowadays you won't find them like that anymore. And why, when you can make them yourself. I want to say right away that making them is not difficult, but it is labor-intensive and time-consuming.

We will need:
- Cotton wool;
- PVA glue diluted with water;
- Acrylic paints;
- Flat brush;
- Styrofoam ball;
- Wire;
- A thread.
We divide the cotton wool into layers. They should be thin. Then we lubricate the foam base with glue and wrap cotton around it. We also soak it. Thus there should be at least five layers. Then let it dry. This takes about 8 – 12 hours.

Now let's make the nose. Roll a small piece into a cone. Lubricate with glue, just leave the base dry. Lubricate the head in the place where our carrot will be attached and attach the nose. We coat again.

Now let's make the headdress. We also lubricate it, but do not touch the base. Then we stick it. To prevent the attachment points from being noticeable, you need to mask them with small pieces of cotton wool and also lubricate them. Let it dry again.

Now let's decorate our snowman. We make a puncture on the hat with an awl and insert a wire loop there. We tie a thread or rope. Now you can hang it on the tree.

The lightest Christmas tree toy made from newspaper tubes
I've never made a toy this way before. Yes, I just didn’t know it was that simple. But when I tried it, I realized that it was as easy as shelling pears. But I want to say right away that you will still need patience. After all, you must first make the tubes, and you need quite a small number of them. and also stock up on glue and paints.

So, first we make the tubes. To do this, cut strips of newspaper 5 cm wide. Wind them onto a knitting needle or onto skewers at an angle of 45°. To prevent it from unwinding, be sure to coat the edges with glue. Then you can paint it any color and dry it. Let's start making a toy. Making a star shape. At the end, be sure to fix it with glue.
If the tube runs out, it can be extended. To do this, insert one into the other.
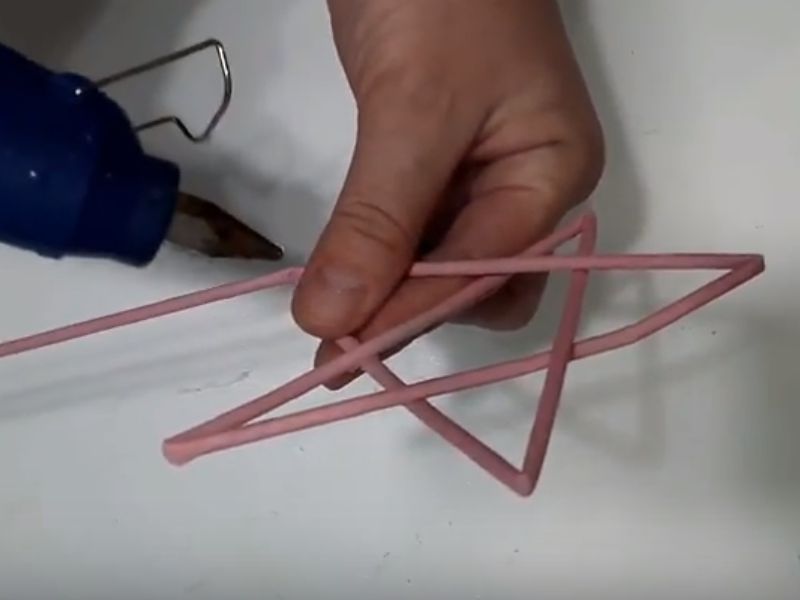
We continue, only now we will wrap our figure with this tube. We wrap the tube around the opposite end in the form of a loop and go to the other end.
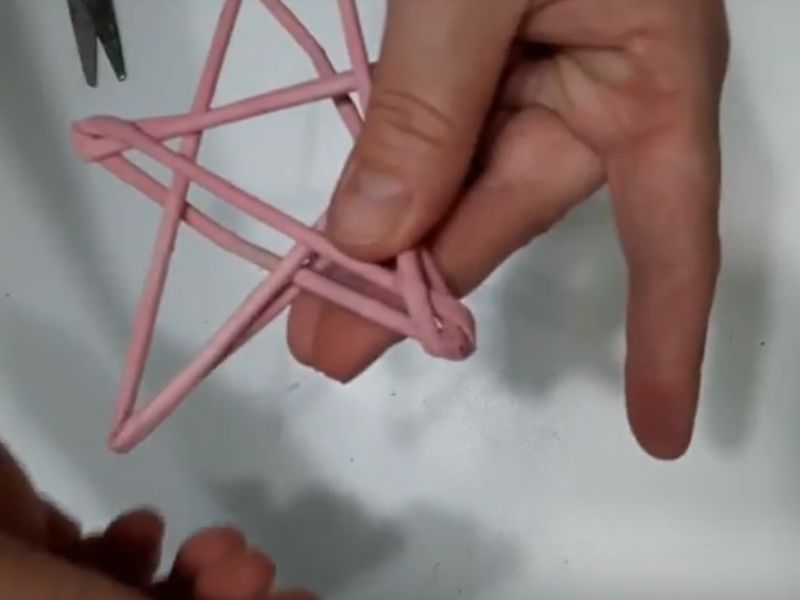
So in a circle until we completely wrap our star. The result is a three-dimensional figure. We insert the end and fix it with glue.

Large do-it-yourself toy for a school competition
I hope you liked the Christmas tree decorations. Now your forest beauty will be the most charming. After all, there is nothing better than handmade toys. And if children took part in the process, then it becomes much more beautiful. Get creative and get ready for the New Year with us!


