How to weave a web from threads. How to make a Halloween spider web from cotton wool
I'm often asked if I know how to make a DIY Halloween spider web. Now I answer everyone - I know and will tell everyone.
We will need
To make our cute one, we will need a hoop (hula hoop), yarn of any color, scissors and possibly tape. 
By the way, I didn’t have a hoop. I used the remnants of the pipe after repairing the sewer system.


Progress
First we need to make the base of our web. To do this, you need to attach yarn, threads or ropes to the hoop (whatever you find for your web). I pulled on 6 pieces of light yarn to create 12 radials on the hoop. To prevent the threads from slipping, they can be secured with tape. 
I knitted the middle with a piece of yarn.


Next, let's pretend to be spiders and weave a web. You need to cut a large piece of yarn. Fold it in half and secure it to any of the beams. You need to move in a circle, wrapping the thread around each ray. When you return to the beginning, the thread must be secured and cut.


When the whole web was woven, I decided to secure it. I knitted each intersection using threads.
To remove the cobwebs from the hoop, simply cut the warp threads.

I just threw the web onto the curtain; it stayed there even if it wasn’t secured.


The woven web can be placed wherever you want. At first I wanted to hang it in a corner under the ceiling, but the ceilings are very high. I didn't want to bother with a stepladder. That's why I hung the cobweb in the niche.


Spiders and cobwebs are classic Halloween decor. If you need to decorate your space for the spookiest day of the year, I'll show you how to weave a web and make a DIY spider in just half an hour.
It seems to me that this is one of the most budget-friendly and fastest projects that have appeared on this blog. The web can be mounted on a wall, on a small or large frame, or using wooden sticks as a base. This simple but stylish decor will perfectly complement the creepy decorations on the street, in the house, in the office or in the space where a Halloween party is planned.
DIY spider web - materials and tools
Time spent: 20 minutes. We will need:
- black thread for knitting
- scissors
- strong double-sided tape.
How to weave a web with your own hands
I worked with regular lint-free knitting threads. If you use mohair, the web will turn out fluffier.
1. Let's start with the basics. Cut 3 threads of the same size. The longer they are, the larger the web will be.
2. Attach the base to the surface. Depending on the finish of the walls, the threads can be secured using tailor's pins or double-sided tape. The main thing is not to spoil the coating.
3. Unwind a small ball of working thread. We tie the tip to the middle where the main threads intersect.

4. Step back a couple of centimeters from the middle and wrap the main thread around the working thread. We transfer the working thread to the adjacent main thread and wrap it again. We continue this way until the web is ready. If the thread runs out, you can tie an additional one to it.


The web is ready. All that remains is to make a resident for her.
DIY spider - materials and tools
Time spent: 10 minutes. We will need:
- aluminum wire - about 50 cm
- wire cutters
- pliers
- Knitting
- PVA or hot glue.
How to make a spider with your own hands
1. Straighten the aluminum wire using pliers and cut it into 3 parts with wire cutters.

2. We tie all three pieces of wire with threads in the middle.

3. We wind the pieces of wire together in the middle crosswise.

4. We begin to wrap the spider's leg. First from top to bottom, and then from bottom to top. To prevent the thread from slipping, you can secure it at the tip with glue. Repeat the step with each paw.

5. Now we form the abdomen. To save thread, you can first wrap the middle with masking tape and the top with knitting threads.


Simple and quick Halloween decor is ready. Have fun and don't be afraid of anything :).
Best,
I won’t be mistaken if I say that soon the whole world will be making crafts. This is one of those holidays when almost every home wants to make a monster for themselves, or an attribute that goes back to the Celtic customs of this holiday. To be honest, I am not a supporter of horror films, especially when it comes to our kids. Agree, you shouldn’t present horror, blood, maniacs and everything like that as something normal or even attractive. And even more so in the form of fun. Therefore, you and I will make more or less nice products.
Surprise gift

For work we need:
- Box;
- Cardboard;
- Buttons;
- Colored paper;
- Glue;
- Scissors;
- Pencils.
Making crafts:

All! You can donate!
Candlesticks

Essentially, this is a jar that is painted and decorated with an applique based on the holiday theme, and a candle is attached to hot paraffin inside.
Decorations are cut out of paper. It could be: spider , cat, bat, owl, cobweb, etc.

If you light a candle in the evening, shadows of these figures appear on the walls. It's simple to do, but the end result is very interesting.
Scary pumpkin
View this post on Instagram
How can you transform a simple applique?
- Cut out a stencil of a pot-bellied pumpkin in cardboard (without the tail, glue the tail separately onto the cardboard).
- Glue thin orange paper to the back of the cardboard. You can draw stripes characteristic of a pumpkin on the front side.
- Glue triangular eyes and a toothless smile onto the back of the paper.
At first glance, this is an ordinary picture. The eyes and smile will be noticeable if shown against the light.
Autumn candlestick
Cover the jar with colored leaves (napkins or paper) in autumn colors. You can make the background monochromatic: yellow, green, red. But you can also combine several colors. Just don’t make it too colorful.
Cut out figures of Halloween characters: a scared cat, a bat, a rat, a ghost or owl . Glue them. The templates can be printed or traced from the screen - the pictures can be enlarged by clicking:
The bats
Bat
It is very easy to make the figure even and symmetrical if you cut out a half by folding a sheet of paper in half.
All that remains is to hang such decorations on the tree.
Bat
To create it you will need:
- Toilet paper sleeve;
- Black paint;
- Black paper;
- Scissors;
- Glue.
Instructions:
- Paint the sleeve black.
- When the sleeve dries, flatten it. Then straighten and press the edges from above and below, connecting the ends.
- Cut wings for the mouse.
- Glue the wings.
- Draw eyes or glue ready-made ones.
Now you can hang the mouse and let it “fly” under the ceiling!
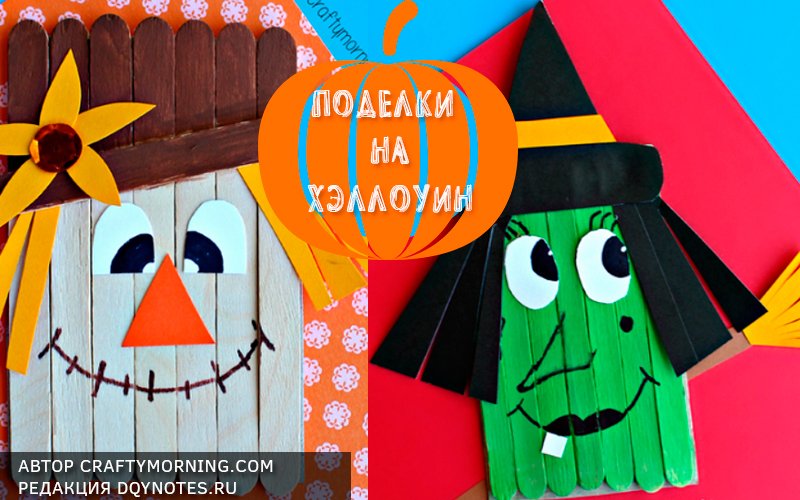
Ghosts and witches
Witch applique
And again we use unusual ideas .
We will need:
- Cardboard;
- 7 ice cream sticks;
- Glue;
- Black, white, brown and yellow paper;
- Black marker;
- Green paint.
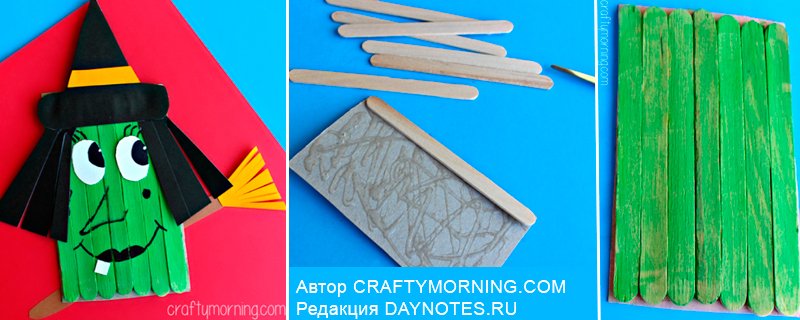
We design:
- Glue the sticks onto the cardboard base.
- We paint them green.
- Cut out a pointed hat.
- Making the witch's hair.
- We paint the face: eyes, smile. Glue on the eyes.
- The final touch is a broom!
A child can easily handle this craft.
Ghost
Simple and fast:
And now you can hang it up.
Naughty ghosts
To make it you will need:
- Black felt;
- White cardboard;
- Strings;
- Cotton balls;
- Glue and scissors.
Manufacturing:
- Cut out 2 figures of floating ghosts from cardboard.
- Glue cotton balls onto this base, completely covering it.
- From felt or paper cut out the face of a ghost. And we fix the eyes and mouth on cotton balls.
- We fix the rope on the back of the craft.
Cheerful witch, I would even say friendly in appearance
Let's make things as easy as possible!
Our product will be composed of several geometric shapes:
- Large triangle (black);
- Rectangles:
- 3 black (2 of them are the same size);
- Green thin small;
- 2 orange;
- Brown is thin and long;
- 3 white circles (one large, 2 small).
If you cut all that out, let's make a cheerful witch:
If you want, you can change something. For example, it would be interesting if the broom was not in the hands of a sorceress, but Magic wand , etc.
Movable toy

Do you want the toy to move? Then let's begin!
The main idea is that the witch should actually “fly” against the background of the moon.
- Paint the plastic plate dark gray. Leave only a large circle. Paint it yellow (or leave it white).
- We assemble a figure from a triangle (body), a circle (head), a small triangle (nose) and a rectangle (hat flap). Let's finish drawing the eye. Glue the hair from red yarn.
- Making a broom. We tie pieces of yarn to an ice cream stick.
- We “set” the figurine on a broom.
- We paint another stick dark gray. And glue it vertically to the figure from below.
- We make a horizontal slit in the plate (below the sun). We thread the stick through the slot.
If you move this wand, the witch will fly!
FELT Pumpkin with treats
We will need:
- Black, green and orange felt (felt);
- Threads;
- Scissors;
- Needle.
Making:
- Cut out an oval and half an oval from orange felt. Download printable template.
- From black - 2 circles, a triangle and a smile.
- We need a small trapezoid made of green felt.
- We sew the oval and half of the oval (it looks like a pocket). And at the top there is a green “tail”.
- Glue the eyes, mouth and nose to the oval.
Why did we make a pocket? To from pumpkin the guys could get the candy treasures we had hidden!
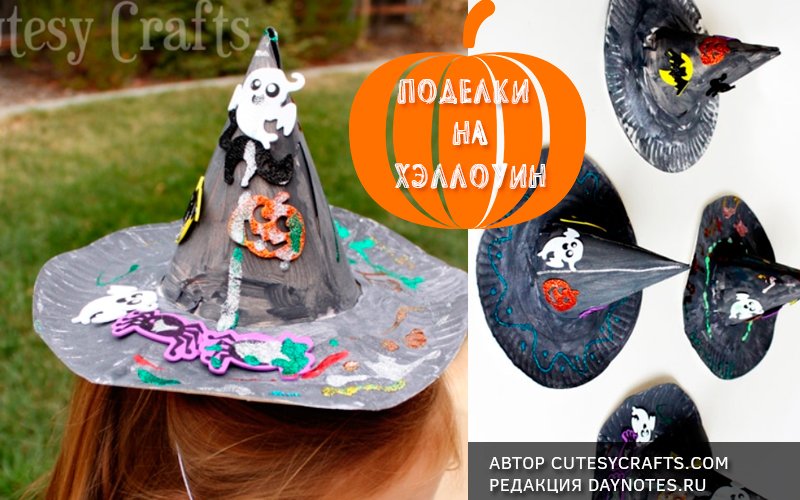
Magic hat and decorations for the witcher
We will need:
- Plastic plate;
- Cardboard;
- Glue;
- Paints;
- Tassels.
Making:
- Turn the plate upside down. We make cuts in the middle of the plate so that it is convenient to bend the central part up.
- Roll the cardboard into a cone. We fix it (you can also use a stapler).
- Glue the cone to the folded edges of the plate.
- We paint the craft black.
- Now you can decorate this hat as you wish.
The second option is to make cuts on the cone itself, and in a plate simply cut a circle along the diameter of the cone, as in the photo below
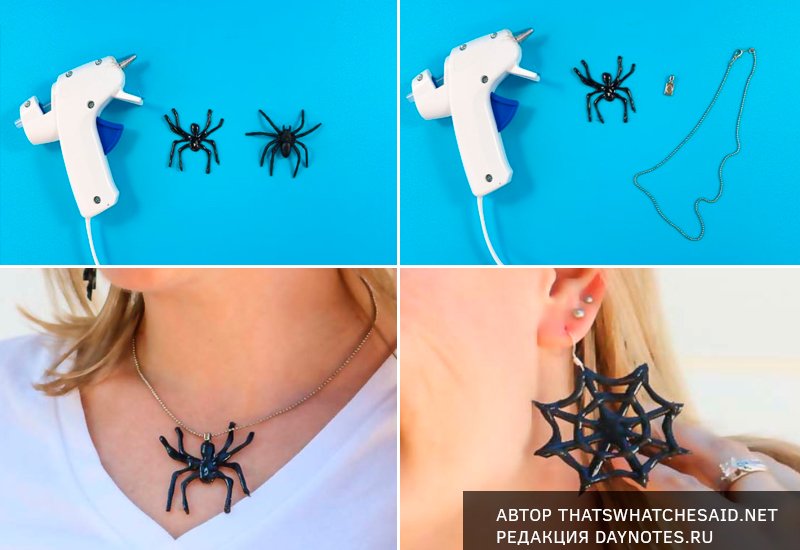
Jewelry - earrings and pendant made of hot glue
Beautiful decorations for a little witcher are easy to make from hot glue. You will need a black glue stick and a hot gun. If there is no black rod, the products can be painted with nail polish or acrylic paint. You will also need spare parts for earrings and a pendant; you can use old jewelry or buy new ones in a special store.
How to do:
- Working with glue is very simple, just like drawing a spider web with a regular felt-tip pen. To prevent the glue from sticking, draw on parchment or a flexible plastic board.
- If there is a temperature control, then choose medium so that the glue is not too liquid.
- If you want to make the body of the spider more convex, then wait until the first layer dries, then apply an additional layer of glue to the body
And a pendant in the shape of a spider.
Tell us about your crafts and how you made them. And share photos. If you have any new ideas, tell me. And don’t forget to check the site (or better yet, subscribe to new articles) so you don’t miss anything useful.
AND THAT IS NOT ALL! FOLLOW THE LINK TO THE NEW COLLECTION. HERE YOU WILL FIND PRINTABLE TEMPLATES AND MASTER CLASSES!


Halloween is a holiday that first appeared among the ancient Celts of Ireland and Scotland. It is celebrated on October 31, the eve of All Saints' Day and, as a rule, it is celebrated in English-speaking countries, as well as in Japan, South Korea, Singapore, Australia and New Zealand. But starting from the end of the twentieth century, this day began to be celebrated in many other European countries and in the former Soviet republics. On this day, many people put on scary costumes and decorate their homes and offices with cobwebs for an interesting Halloween holiday, quickly and step by step with their own hands.
We bring to your attention several options for making a web for the holiday with your own hands using different techniques, for example, from paper.
How to make a huge spider web for Halloween with your own hands

To create a large rope web you will need the following contents and materials:
- Double-sided adhesive tape;
- Gray or black thread;
- Spider for decorating webs (plastic or other material).
After preparing all the necessary materials and tools, start making a dark decorative web from threads. Before starting all the manipulations, think carefully about how your web will look - what size it will be, and how your threads will go. Based on this, stick small pieces of double-sided adhesive tape to the wall - you will need a lot of pieces.
First glue the pieces of thread that will go in the direction from the center (straight lines), and then start gluing the threads that go around the circle of the web. If desired, attach a toy spider to your large web.
Making a spider web from gauze: a detailed description of the work
Ordinary gauze is also suitable for interior decoration. Cut a suitable size piece of medical gauze. Start stretching it randomly. You can even make holes in the fabric in places. Such a web looks best in the form of randomly hanging rags. You can wrap it around individual objects in the room. If desired, dye the fabric any color. If you decide not to paint all the gauze you are using, you can highlight individual areas of it with a coloring compound that must be applied with a brush.

It is not necessary to use this decorative element only in the interior. You can add cobwebs to a suit or some small accessories. Creating this decoration is very simple. It all depends on what material the selected product is made of, for example, beads. If you have enough time to prepare for the holiday, you can even paint glassware with special paints. You can draw by hand or using a stencil. If you wish, you can simply draw a web on the skin. It will also look good in an embroidered version on fabric. Don’t forget about textile paints, which allow you to apply any image to clothing.
Trying to make a web from threads: ideas and description of production
If you need to decorate walls or floors, the best option would be a woven web. To create it you will need threads, the thickness of which depends on the size of the finished decoration.
For convenience, draw a random sketch on a piece of paper. Start with the basics. To do this, take several pieces of thread of equal length. Cross the first two with their middles. Secure in a convenient way - push pins, pins, wire or double-sided tape will do. Then fasten the remaining threads in the same way, making sure that the intersection point is the same for everyone, and the segments are connected exactly in the middle. At this stage, the Halloween spider web looks like a star. Now you can start weaving the spider web itself: moving in a spiral direction, you need to connect the guide threads. Avoid excessive tension. It’s up to you to leave the ends loose or secure them with one more turn.

If you want to wrap lamps, interior details, or an entire closet in cobwebs, you will need a couple of spools of fine thread. Wrap it randomly around an existing object. You can allow it to sag, or you can form a tight, dense cocoon. This technique will look interesting with white or gray threads. If you wish, you can paint the cobweb yourself in a dirty-dusty color. To do this, thoroughly soak the thread in a solution of black paint, dry it, and then start winding. To give elasticity and durability to the web, you can make it from threads soaked in PVA glue. But remember that such decoration can smear the base with the composition. It is ideal for decorating disposable tableware and bottles for the table.

Video on the topic of the article
We offer several videos demonstrating how to create a web for the holiday with your own hands. Enjoy watching!
Even though it's Halloween - a borrowed holiday, to which in our country some part of the population has an ambiguous attitude, we are glad to have the opportunity to once again have fun and prepare themed treats, entertainment and, of course, an appropriate “gloomy” atmosphere for loved ones and friends.
Flickering lights, artificial cobwebs, pumpkins with faces, guests in the most unimaginable costumes - Halloween 2017 can become another pleasant memory in your memory bank. You don't need much to prepare for the holiday and decorate your home: from mid-October, supermarkets and small shops offer various options for scary, but very cute decor. We suggest creating it yourself, because the process of preparing for the holiday is no less important and exciting than the celebration itself!
1
Jack-o-lantern
So, the main symbol of All Saints Day - it's a pumpkin! To make a beautiful “pumpkin head” you don’t need any experience: in most cases, the first time it comes out quite acceptable. The pumpkin can simply have eyes and a mouth cut out, or it can be illuminated from the inside with a flashlight or candle. You can also leave it standard natural, or cover it with any paint of your choice. Sometimes instead of eyes and a mouth, patterns are carved on a pumpkin, but for this you will need good imagination and the ability to draw these same patterns, so for beginners we suggest trying to make the traditional “pumpkin head” attribute - a lantern.
First, wash the pumpkin, dry it with a napkin and cut off the top. Then you need to carefully clean the pumpkin (under no circumstances throw away the contents of the pumpkin, you can cook it later). Draw eyes, nose and mouth (with or without teeth) with a marker or pen. Take a sharp and thin enough knife that will be convenient for you to cut out the drawn parts of the “face”.
Once the “head” is ready, place a small round flashlight or candle inside. Now your pumpkin will invitingly illuminate your “gloomy” home. By the way, now we will continue to make it dark!

2
Paper bats
Bats, which probably turn into vampires at night and drink human blood, in our case can be made from thick colored (black) paper or cardboard. To do this, you need to draw or find a bat stencil on the Internet and print it. Then cut out the silhouette, trace it on paper, cut out the required number of night creatures and voila - A flock of bats has settled in your home!
Mice can be glued to window panes with tape, pinned to curtains with pins, or simply glued to each with a rope or thread and hung on a chandelier, picture or doorway.
By the way, you can also make black cats, spiders, witches and any other creatures out of paper.


3
Ghosts from old sheets
What Halloween would be complete without ghosts? You definitely need to invite a couple to your home! Making a ghost is even easier than making a jack-o'-lantern. You will need old white sheets, tea towels or cloth napkins (depending on what size ghosts you want). You can hang a fabric over the chandelier lampshade so that the ghost lights up (by the way, in this case, you can use a blue or red lamp to enhance the effect), or you can simply hang your ghost on an inverted large drinking water bottle (the main thing is that its bottom, which acts as the ghost's head was round in shape). Then draw eyes and a mouth on the fabric with a black marker. Elementary, right?

4
Cobweb made of padding polyester
Artificial spider webs for Halloween from theme stores are actually a useless thing, because you can easily make a spider web completely free of charge from padding polyester. The main thing is to masterfully stretch it somewhere in the corner of the room, on top of paintings hanging from a chandelier, or on any surfaces where a real cobweb could appear. But you can buy the spiders that you plant on the web at the market. Although, if you have patience and wire... Even a child can make such a spider. Well, you can always return to the paper version.

5
Ghosts made of bottles and glowing garlands
We think there should be a lot of ghosts in the house on Halloween. In addition, in order to save electricity and create a mystical atmosphere, it is better to make do with candles and New Year's garlands of lights. By the way, you can put them in any container, from which you can easily create a funny or scary face by coloring it with a marker. You can cover any jar with paper and paint, draw patterns or a face, and put glowing garlands inside.