Dresses with voluminous flowers. Simple flowers made of fabric with your own hands, or decor “on your knees”
Flowers made of satin ribbons for hairpins


Materials and tools
- light synthetic fabric: acetate silk, organza, tulle, voile, crepe-satin in two colors - for flower petals and for leaves;
- metal base for the flower - automatic hairpin;
- a small piece of felt to match the color of the leaves;
- a glue gun or other universal glue (preferably one that glues metal);
- a needle and thread in two colors to match the color of the petals and leaves;
- a strip of corrugated paper to match the color of the leaves;
- soft wire, about 30 cm long (you can use beading wire);
- a small piece of double-sided adhesive pad (available at fabric or craft stores);
- satin ribbon matching the color of the leaves, 5 mm wide and about 1 m long.
- scissors, candle.
From the fabric for the petals we cut squares with sides 3x3 cm, 4x4 cm, 5x5 cm, 6x6 cm - 5-7 pieces for each given size. The result will be approximately 20-30 squares. The more blanks, the more magnificent the flower will be.

From each square for the petals we cut out figures in the form of truncated droplets or hearts - without a sharp tip. Look at the photo:

In the flame of a candle, carefully melt each petal.

As the fabric melts, it becomes deformed, and we get petals that look like real ones!

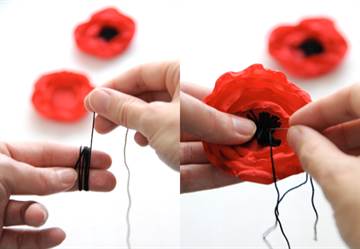
We start sewing the flower from the middle, from the smallest petal. To do this, we twist the petal into a tube and stitch it at the base with matching threads.

Gradually add and sew new petals in a circle - from the smallest blanks - to larger ones, forming a flower.

Making leaves. We cut out rectangles measuring 9x4 cm from green fabric. We plan to make 3 leaves, so we will prepare 6 rectangles from the green main fabric and 6 rectangles from the adhesive double-sided interfacing. We also need wire - three pieces of approximately 10 cm each, corrugated paper in the form of a long ribbon 1 cm wide.

We wrap each of the three pieces of wire with corrugated paper - we form the basis for the leaf. Glue the ends of the paper.

We form a sheet by folding the blanks together (like a sandwich): green flap + gasket + curved wrapped wire + gasket + green flap.

We glue this “sandwich” together by ironing it with a heated iron through dry gauze or a thin white sheet of paper. The double-sided adhesive pad melts under the iron and holds the fabric and wire frame together. We cut out the leaves from the rectangle, melt their edges over the candle in the same way as we did the petals earlier.

We make “bows” from a satin ribbon, stitching the centers with threads to match the color.

We put the leaves together and sew them together, attaching bows. Glue the flower to the leaves. After the glue has dried, you can additionally sew the leaves and flower together for a strong connection.

Glue a piece of felt onto the base of the hairpin. It is better to do this in advance so that the glue has time to dry. Glue the flower to the hairpin. We follow all gluing instructions written on the tube! - so that our flower stays firmly on the hairpin and does not deteriorate when worn. Leave for a day for the glue to dry.

The hairpin with a voluminous flower is ready. Our rose turned out beautiful, spectacular - just like a real one!


- for: nylon or satin ribbon in two colors - 10 pieces of one color and 5 of another. The length of the segment depends on the width of the tape. With a width of 2.5 cm - length 7 cm, with 3.5 (3.8) cm - 8 or 9 cm, with 5 cm - 10 cm. The wider the ribbon, the larger the flower;
- for the bandage: satin ribbon 2.5 cm, approximately 50 cm long;
— elastic band 2 cm - cm 10;
- scissors;
- needle with thread;
- bead or rhinestone for decoration;
— burner/lighter/candle.
So let's get started. If you have a burner, then use it to cut the tape into pieces of the required length (depending on the width of the tape), at the same time singe the edges so that they do not fray (photo 1). If you don’t have a burner, then cut it with scissors and burn the edges with a lighter or over a candle flame. These are the petal blanks we got (photo 2).

We fold the ribbons at an angle of 90 degrees so that there is an equal distance from the edge of the ribbon to the corner (photo 3). Fold it again, connecting points A and B marked in the photo. It should look like photo 4 (view of the wrong side). Photo 5 - side view. We string the petal onto a thread and a needle. We start from the front side, make 2 stitches (photo 6).

In this way, we collect five petals in a circle and tighten them (photo 7). View from the front side - photo 8, view from the back - 9. We make two more of these flowers, collect all the tiers of our flower using thread and needle or glue (photo 10, 11). We decorate the center of the flower with a bead, rhinestone or a beautiful button (photo 12).

Take a satin ribbon for a bandage. Having stepped back 2-3 cm from the edge, we make an incision and singe the edges (photo 13). We insert an elastic band into the cut, sew across the length of the tape and along the edges, without catching the elastic along the dotted lines marked in photo 14. We do the same on the second side, turning it right side out (photos 15, 16).

We bend the edge of the satin ribbon under the elastic and stitch it without catching the outer layer of the ribbon (photo 17). This is what should happen on the front side - photo 18. We do the same on the second side of the elastic, this is how the bandage turns out - photo 19. Determine the place where the flower is attached and sew it on.


The American bow is a voluminous bow with many intricate curls. Such a bow is usually made from grosgrain ribbons of different colors and different widths. When looking at the American bow, it seems that making it with your own hands very difficult. In fact, this is not so, because this design consists of several different bows assembled together. So, let's try to figure out how to make an American bow with your own hands.
, ribbon bow. American bow
This complex hair clip is made from a large number of ribbons of different widths. To create the bow itself, take a ribbon that contains some kind of pattern or just polka dots. The background ribbons can be plain or contain a motif that emphasizes the design of the main bow ribbon. The ribbons themselves must be made of rep.
To create an American bow we will need:
Rep ribbons.
For the main bow you will need three ribbons of different widths (it is better that the width of the widest one is no more than 3-3.5 cm). For the background, 3-4 types of ribbon on which the bow itself will be located can be from 1 cm to 2.5 cm wide. This is not fundamentally important. The only important thing is that you arrange them harmoniously, but more on that later;
Scissors;
Cardboard;
Needle and thread;
Glue;
Pin, clips;
Lighter.
To create an American bow, we need to learn how to make its famous curls. We will use a special template that we will create ourselves. Take a regular piece of cardboard 15x7.5 cm.

Cut a line exactly in the middle, 0.6 cm wide and about 3.8 cm long (a little more than half).

We will need three such templates of different lengths. Each is 2.5 cm smaller than the other, but the width remains the same. I got templates with lengths of 17.5 cm, 15 cm and 13.5, respectively.

Prepare a 2.5 cm wide ribbon, a pin, a clip, a needle and thread and a template. We begin to form a bow.

Using a clamp, secure the tape at the edge of the template, on the side where the slot is located.

Wrap it around the template twice. Insert a pin through the template, into the center of the tape, to secure it (as shown in the picture above).


Carefully remove the tape from the template without removing the pin.

The next step is a very important part in creating the American bow. Hold the ribbon with the tail up and fixing the center of the ribbon, where the pin is located, with your fingers we begin to separate the turns to the sides so that we get something X-shaped.

Pull the stitches until a uniform "X" is formed. When you look at the back of the bow, the ribbons should be aligned horizontally.

Using a thread and a needle, make several stitches exactly in the middle of the bow. Make sure it doesn't lose its X shape.

Pull the thread tightly, wrap it several times and secure with a strong knot. 

Using the same technique, make 2 more bows, but with templates of different sizes.
The next part of creating an American bow is creating the background, such “spikes”. To form it, you can take ribbons of any width, for example 3.8 cm, 2.5 cm and 1.5 cm wide. Cut each 12.5 cm and make a V-shaped cut at the ends, which is immediately sealed using a lighter.

Take 2 ribbons of the same color, place them crosswise and pierce the middle with a needle.

Do the same with the rest of the ribbons, placing all the layers on top of each other. Thus, organize a beautiful background for the bow and give it an X-shape, as shown in the photo. When all the ribbons are in place, sew tightly right in the middle and tie them with thread.

These are the parts we should end up with. Now they are all ready to come together and create an American bow.

The American bow hairpin is ready! All that remains is to attach the middle in the center. But I leave this decision up to you.

Attach the base on the back side. It could be either an iron “crocodile”, or a small automatic hairpin, or an elastic band, or... Your option.

Beautiful hair clips can transform any hairstyle - the more original the hairpin, the more interesting the hairstyle looks. The most original, unusual and unique hairpins are those that made by hand. Let's try to make an interesting hairpin from ribbons in a retro style.
Materials:
metal hairpins,
4 mm wide tape of any color
hot glue gun.
Instructions:
You need to take a hairpin and 60 cm of ribbon. The middle of the ribbon cut is placed at the base of the open clip. Then you should pass one edge of the tape through the middle, but through the outside. Repeat with the second ponytail too.

This weaving continues along the length of the entire decoration. After this, a tight knot is tied at the end.

This is what the hairpins looked like before.

But we won’t stop there and will make them more modern and sophisticated. The remaining tails of the ribbon are twisted and the flagellum is folded in half, forming a spiral cord.


And now we have in our hands excellent hairpins, made by ourselves in retro style!

You will need the following materials:
- two sushi chopsticks (sold in any large supermarket);
— brown acrylic paint;
- a small piece of fabric with a beautiful ornament;
- decorative thin cord approximately 10-15 cm;
- PVA glue and brush.
How to make a hairpin. Master Class.
1. Cut the wooden sticks so that their length is approximately 18 cm. Cover them with brown (or black) acrylic paint and leave to dry.

2. Lubricate the upper part of the stick with PVA glue. Now wrap each stick with cloth (see photo). Fold the raw edges of the fabric, glue along the fold and attach to the stick.

3. Apply glue to a small area of the stick below the fabric (about 1 cm), and wrap it several times with decorative cord. Secure the ends of the cord well with glue.

That's all, our oriental style hairpin is ready.

How cute little girls look in beautiful dresses and with delicate flowers on their heads! It turns out that such a cute decoration as an openwork flower can be easily made with your own hands.
To create such a cute headband for a girl, you will need a minimum of effort and free time, but despite this, it will look great and will be a wonderful addition to any little fashionista’s outfit.

Headband with a flower for children, handicraft masterclass:
For work you will need: lace, a piece of felt, a beautiful button or bead, elastic lace or a wide elastic band, and for older girls you can take a regular plastic headband, scissors and a glue gun.

Using hot glue, glue the gathered lace onto the felt circle: start from the edge and move inward in a spiral.


Glue a bead or button into the middle and glue the finished flower onto the base.


That's all: the wonderful headband for the little princess is ready! Isn't it easy and simple?

More ideas


It is difficult to imagine a wedding ceremony and celebration without flowers: they are an obligatory component of the bride’s bouquet and the groom’s boutonniere; they are used to decorate cars and the banquet room. But sometimes living plants are not able to withstand too hot or cold weather, and temperature changes negatively affect their appearance. In the article you will learn what an alternative is, how to make flowers from fabric with your own hands so that they look beautiful on your wedding day and are preserved in memory of the joyful day without losing their original appearance.
Master class on making artificial flowers from organza
Artificial flowers made using organza look charming. This is due to the frequency of use of the material when sewing a wedding dress, which means that the accessory will go perfectly with the bride’s outfit. In addition, the fabric is very comfortable and pliable to work with, which will facilitate the process of creating a masterpiece, and the variety of color shades makes it possible to choose colors that best suit the decoration of the celebration.

Necessary materials
To make organza flowers you will need:
- Organza. The color of the fabric depends on the preferences of the bride and the theme and style of the wedding. Materials of different shades can be used to create an interesting composition. If it is impossible to find organza, chiffon or satin will do.
- Sewing accessories - needle, thread, wire.
- Beads, beads for decoration.
- Candle, matches.
- Paper needed for drawing patterns and sketches.

Stages of creation
A detailed master class will help you learn how to make fabric flowers with your own hands:
- We are preparing patterns for future buds. To do this, draw several circles of different diameters on paper. To make the circles as even as possible, you should use glasses of different sizes or other round objects. After drawing, we cut out the elements and transfer them to the fabric. Using ready-made templates, we cut out several circles of each diameter from organza - we get blank petals.

- Light a candle. As you hold each petal, melt the edges a little. In order to determine at what distance from the fire to keep the fabric, practice on unnecessary sections. Small parts should be scorched, holding them with tweezers so as not to burn your hands.

- Let's start assembling. It is better to start with the large lower petals, gradually adding the rest. The middle needs to be decorated with beads or seed beads, sewing them on or stringing them on wire. The organza peony is ready.

- To create a rose from organza, during the first stage you need to make five shallow cuts on the finished fabric mug. When processing parts with fire, it is important to ensure that all the petals curl in one direction, then the bud will look neat and beautiful.

Simple decorative flowers made from ribbons
Many brides on the eve of the wedding are thinking about how to sew and make flowers from fabric so that they look beautiful, complement existing accessories and decorations, and blend harmoniously with them. Often the problem is the lack of necessary materials, skills and experience in creative work. But in order to create amazing exclusive flowers from ribbons, you don’t need special equipment or great skill. The main thing is a little patience and imagination, and a detailed master class will help you realize all this and create a real masterpiece with your own hands.

Necessary materials
In order to make buds from ribbons, you will need:
- Satin ribbons of two colors (main and for leaves). Particular attention should be paid to the width of the ribbons - the wider and longer it is, the larger and more voluminous the product will be.
- Threads, needle.
- If desired, beads or rhinestones can be used for decoration.

Stages of creation
Let's look at two options for how to make beautiful flowers from fabric, both are simple, but the result will definitely please you, and the finished accessories will serve as an excellent decoration. Master class No. 1:
- Cut a satin ribbon of the required width, 50 cm long. Fold one edge to form a triangle.

- We fold a small corner and secure it with a needle and thread.

- We collect the ribbon onto a thread, folding it to form a beautiful “accordion”. How to do it correctly, look at the photo.

- Having collected the entire ribbon, it must be wrapped around the base, forming a beautiful rose. Secure everything with thread so that the composition does not fall apart.

- To create a leaf, cut a ribbon 10 centimeters long, fold both ends into the middle, forming a triangle. Sew and tighten the triangle at the base. The leaf is ready. To create a beautiful composition, you need at least two leaves for one flower.

- We combine the flower with the leaves - the masterpiece is ready.

Master class No. 2:
- Cut a satin ribbon 35 centimeters long. We bend the edge away from ourselves and begin to twist the flower. We secure the base with a thread, not reaching the fold line.

- We bend the ribbon towards itself, forming a petal. We continue to twist the rose, wrapping the ribbon towards ourselves.
- We sew the end of the ribbon from the inside out, fastening all the layers with thread so that they do not fall apart.

- By analogy, we make the required number of flowers, from which we will make an accessory or decoration. Such textile accessories are perfect for creating a wedding topiary.

Large flowers made of fabric using the kanzashi technique
Fabric flowers made using the kanzashi technique are original and beautiful. Such accessories can be small in size and used to decorate a wedding dress, a headband for the bride’s hair, or boutonnieres for guests. If desired, in this way you can make a large flower, which will decorate the wedding procession or banquet hall. The advantage of this technique is the ability to make a flower of absolutely any color, size, without spending a lot of effort and money.

Necessary materials
To make a flower using the kanzashi technique you will need:
- Satin ribbon. For a large flower, a wide ribbon is needed. In order to get a multi-colored masterpiece, it is worth buying material of different shades; the golden elements in the product look good.
- Glue gun, Moment-Crystal glue.
- Threads, needle, scissors.
- For decoration - beads, seed beads, rhinestones, small decorative ornaments in the form of insects (butterflies, ladybugs).
- Cardboard or ball, plastic bag.
Stages of creation
To create large flowers in the kanzashi style, two methods can be used; we will consider both so that everyone can choose the most suitable and simple option for themselves. Master class No. 1:
- We cut the satin ribbon into 7 cm lengths. Fold it in half and cut it at an angle using a soldering iron.

- On the other hand, we wrap the tape in the opposite direction, singe the edge, due to which the two ends of the tape are connected. We make the required number of blank petals, which depends on the desired size of the flower.

- We take cardboard and draw a circle along which we will glue the petals. The larger the diameter, the larger the resulting accessory. Glue all the petals in a circle.

The second option for creating kanzashi involves creating a large, round, convex flower:
- Cover the ball with a plastic bag. The size of the finished product depends on the diameter of the ball.
- We make petals that will serve as the basis of the product.
- Using a thread and a needle, we connect the seven finished petals into a circle and secure them. A small flower comes out, which we attach to our ball in the center.
- Next we glue the petals, placing them between the elements of the previous row.
- We glue one more element to the petals of the first row, and two on each side to the parts of the third.
- By analogy, we glue the remaining petals until we get a flower of the desired size.
- We remove the ball and plastic bag, our masterpiece is ready.

Today, without any special skills or experience, you can turn even the most boring dress into an original and bright outfit for a party, because there are a lot of ideas, video tutorials and master classes on making various decorative elements with your own hands. To stand out from the crowd, you can decorate your dress with a contrasting flower. And if you want to become the most extraordinary bride, then add bright ribbon decorations to your wedding dress. Today we will learn how to make a flower from fabric with your own hands for a dress - both voluminous, and small, and multi-layered, so that with its help you can attract everyone's attention and make your image more feminine and romantic.
How are fabric flowers created?
In fact, there is nothing complicated, the main thing is to study each stage in advance, so as not to redo the whole work again later. You can make a fabric flower on a dress with your own hands in a few steps.
Pattern
If you still haven’t been able to find a ready-made pattern, you can draw it yourself using a pencil and ruler. You can also use a very ordinary compass and use it to draw a circle, which will be the pattern for creating the petals. You can even take measurements from a real flower.
First, the most beautiful flower in your opinion is taken and carefully disassembled into petals. Then each of them is outlined on cardboard and the blanks are cut out along the edges.
Important! These elements need to be cut on the fabric on a bias. It’s better to use a ballpoint pen to trace the template so that there are no marks left after cutting.
Material selection
In principle, you can make a flower from any fabric, for example:
- silks;
- organza;
- chiffon;
- atlas;
- velvet;
- flax;
- crepe de Chine.
Important! It is better to give preference to natural materials, since they stretch well and can be easily corrugated. Synthetics do not have such properties and overheat quickly enough, which is why the flowers can become deformed.
Petal coloring
As a rule, this procedure is resorted to if it is necessary to achieve 100% resemblance to a real plant. Best suited for this:
- confectionery and aniline dyes;
- photo paints and gouache.
Important! You can dye the fabric completely or each petal separately. First, the pieces of fabric are blotted with water and then laid out on a glass surface. Then, using a brush, the paint is applied to the product.
Fabric preparation
In order for your flower to keep its chosen shape well in the future, you need to starch the material a little or treat it with gelatin. Making such a solution is very simple:
- You need to dilute two tablespoons of gelatin in a glass of cold water.
- Let it swell and then heat it in a water bath.
You need to dip the fabric into the hot solution and wring it out, then dry it and iron it.
Shaping
To make the petals curved, two main techniques are used:
- In the first case, the contours of the petals are burned using a lighter or candle.
- The second method involves the use of bulk. This is a special tool that needs to be heated and given the desired shape to the product. Curling occurs with a special knife, that is, with a crochet hook. And it turns out to be convex thanks to the heel.
Making pistils and stamens
It is thanks to the stamens that flowers become like real ones. And they can be made from thread, which must first be soaked in a solution of gelatin or starch, as well as paint color.
You can make a pestle by wrapping paper around a wire and painting cotton balls in the desired color.
Making the flower core
You can decorate the middle of the plant with a button, beads and even cotton wool. You can glue them to the desired place using PVA glue, which does not leave marks on the fabric.
Making flowers from fabrics with your own hands
Now let's take a practical look at how to make a flower on a dress with your own hands. The master class as a guide can be downloaded from any site of this specificity or viewed online. We will train on the simplest examples in order to thoroughly study this process.
Flower with lace center
To create a beautiful flower, first you will need a small piece of dense material in bright colors. Now follow the instructions:
- Cut out several circles of the required diameter.
- Fold each element in half several times.
- Secure the resulting petals with a regular seam along the bottom edge.
- Collect all the details into one whole.
- Sew a piece of knitted border or lace in the center of the flower.
- To hide all seams, attach a button on top.
Making roses with your own hands
The rose is the queen of flowers, a symbol of love and beauty. Therefore, many, when deciding which flower to make, stop at this:
- To work you will need a pink or red ribbon 35 cm long.
- Then you will need to bend the edges away from you and gradually roll up the rose.
- The base should be secured with a thread, slightly short of the fold.
- From the inside you need to sew the end of the tape, fasten all the layers.
Everything is elementary simple!
Original flower made of chiffon and satin
If you wish, you can even create a dress from artificial flowers with your own hands. Naturally, for this you will need a base, that is, a simple, unadorned dress and a large number of decorative elements. These materials are ideal for creating flowers from circles.
Important! It is better to use different fabrics at the same time.
Making ornamental plants is very simple, the main thing is to follow all the recommendations:
- Cut at least five circles of different diameters.
- Finish the edges with a lighter.
- Starting with the largest petal, assemble the flower.
- Pin all layers together using a pin.
- Fastening the petals, sew the decor to the dress.

How to make an aster yourself?
How to make a flower on a fabric dress with your own hands so that it looks as much like a real aster as possible? Easily!
- Take a ribbon of the desired shade, cut it into strips about 7 cm long. That is, how many petals you want to see in your flower, do so many.
- Fold each piece in half, using a soldering iron, cut at an angle so that the tops of the petals can be formed.
- Wrap them from the bottom in the opposite direction, singe the edges to thereby connect the ends of the tape.
- Cut a circle out of thick paper to match the diameter of the flower. Gradually glue the petals onto it, just start from the very edge, slowly approaching the center.
How to make a convex flower?
Now let's look in detail at how to make a flower out of fabric on a dress so that it turns out large and convex. We proceed as follows.
Magnificent voluminous flowers can turn any dress into a luxurious evening outfit. How to sew such flowers and decorate things with them - in BurdaStyle's step-by-step master class.
2. Fashionable embroidery


Decorating a dress with embroidery - in ethnic or abstract style, colored or plain satin stitch, cross stitch or openwork - is also a great idea. To be on trend when choosing a motif and colors for embroidery, read our review of what and how it is fashionable to embroider on clothes this season.
3. Decor with beads, seed beads and rhinestones

Another option that allows you to make a simple dress elegant is to embroider it with beads, beads or rhinestones. A selection of various options and ideas is in our review.
4. Lace collar

Such a charming collar will instantly make a dress for a very young fashionista look elegant or transform a strict, modest “adult” outfit. Making such a decoration is very simple, and you do not need to know how to weave lace. More details in the master class.
5. Peter Pan collar

Elegant and strict at the same time, such a collar can decorate both a simple knitted everyday dress and an evening outfit. It can be sewn either from white or other plain fabric, or from printed fabric or material with an interesting texture. Same pattern - completely different results! Details are in the step-by-step master class. (There you will also read the history of the origin of the unusual name for such a collar.)
6. Shiny collar

This collar is quickly sewn from a base fabric and several types of braid with beads and sequins. Details are in the BurdaStyle master class.
7. Decorate the dress with a bow

The bow can be sewn from the same fabric as the dress, or you can make it contrasting; you can leave the bow removable or sew it to the collar. How to sew a bow - read in the master class.
8. Retro lace collar + bow

A little lace and leftover silk fabric are needed to create such a gorgeous accessory that will add charm to a basic dress.
9. Flounces + frills

Flounces, ruffles and frills add femininity and romance to the dress and the overall look. Read about how to decorate a dress with flounces and frills in the BurdaStyle material. There is also a selection of ideas for decoration.
10. Heart Frill


This original voluminous frill can be used to decorate the neckline of a dress, decorate sleeves, a belt at the waist, pockets, or highlight other details. Read how to make such a frill-chain from convex hearts in the BurdaStyle master class.
11. Ribbon ruffles

You will need a lot of rapeseed or silk ribbon for such decoration, but the result is impressive.
12. Decorative patches

A method that allows you not only to decorate a dress, but also to repair it, for example, by disguising a stain or hole on the hem. This option is suitable for a children's dress for any season, plus for a summer or original women's dress. Details are in the master class.
13. Color blocking applique

The beauty of color blocking is that you can successfully combine really bright and rich shades that will look cohesive and harmonious. If you are not ready to sew a whole product in this style, start small - decorate the dress with appliqués.
14. Chiffon butterfly appliques


Butterflies - be it decoration, design or appliqué - are a great way to add a touch of feminine frivolity to any outfit! These butterflies are made of translucent chiffon. Read how to decorate a dress with such an applique in the BurdaStyle master class.
15. “Cat appliqué”

Depending on the material you choose, you can end up with a cute domestic or wild cat. This applique can be used to decorate a child’s or women’s dress in a sporty or casual style. Detailed master class - follow the link.
16. Leather applique

This thin leather appliqué can be used to decorate a knitted dress in a sporty style. However, another pattern may be suitable for a dress, for example, in a casual style.
17. Hot-melt fabric applique

If you have a piece of fabric with a beautiful print, you can decorate your dress with it by making an appliqué. You will need a special double-sided adhesive pad: with the help of an iron you will fix the design on the fabric of the dress... Details are in the master class.
18. Applications for every taste

19. Fringe for a summer dress

This decoration looks both delicate and interesting. How to quickly and beautifully decorate a short summer dress with fringes and wide facings - read in the master class.
20. Decor from a Pavlovo Posad scarf

A simple plain dress can be turned into a completely unusual and magnificent one by decorating it with fragments of a Pavlovo Posad scarf. How to do this - read the detailed master class.
21. Decor with pleated elements

The decor from pleated elements looks luxurious and elegant. you can decorate the dress with a peplum and/or pleated cuffs. Read how to do this in the BurdaStyle master class.
22. Patterns drawn with yarn

Designer looks from the catwalks often surprise with their unusual approach to detail! If you want to add a pop of color to a neutral outfit, try our idea of using yarn to draw patterns on your dress. How to do this - see the master class.
23. DIY print

You can decorate a plain dress with a print by making it yourself. You can choose the pattern and color to your taste and decorate the entire dress or part of it. More details in the master class.
24. The dress can be dyed

In this way, you can dye the fabric to then sew an unusual dress from it, or modify an already finished product using the same instructions.
25. Decor of a little black dress

Are you tired of your little black dress? Liven it up with colorful motifs!
26. Flowers made of sequins and beads

A dress decorated with a scattering of such flowers will sparkle and sparkle in a new way! How to make such cute flowers is a step-by-step master class from BurdaStyle.
27. Decor with cord buttons

If your dress has a button closure, you can decorate it by replacing regular buttons with original ones - for example, these ones, woven with your own hands from cord. Instructions are in our master class.
28. Decoration with fabric buttons

Fabric buttons look very beautiful. And most importantly, you can choose the ideal color of the material and decorate your clothes with designer accessories.
29. Bow neckline decor

Photo: www.tillyandthebuttons.com
This method is ideal for a deep round neckline, and bows made from both main and contrasting fabrics will look good. If you have a low back dress that you're a little tired of, try adding a bow to the neckline to add a flirty touch.
30. Decorating the hem with scallops

With the help of our master class, you can decorate almost any dress to your taste with festoons! It is suitable for both hems and sleeves, as well as necklines.
31. Fancy straps

If you have an open dress, you can replace simple straps with these unusual ones, or add them to a dress with a corset-type top. How to make straps - read the master class.
32. Decoration with braid

This is how you can decorate the hem and/or sleeves of a summer dress or a dress for a girl. The beauty of this method is that the braid looks very airy, especially if you not only process the edge, but also make an insert.
33. Decor made of leather inserts

Geometric details made of fine contrasting leather will make any item special! Read how to change a finished dress using inserts in the BurdaStyle master class.
A fabric flower can be considered a magnificent decorative element for a dress. It can transform your appearance and add a touch of mystery and charm. By learning how to make flowers on a fabric dress with your own hands, you will create a unique image. Master classes with photos provided in this article will help you create this decorative element.
History of the canvas
The fabric appeared before our era. People made it from the natural materials available at that time - wool, silk thread, flax and cotton.
Woolen fabrics were created using animal wool and down. First they spun the thread, then wove it into cloth. This material was the basis for the clothing of our ancestors, who needed to survive in difficult conditions.
Silk threads were extracted by Chinese craftsmen from silkworm cocoons. Legend has it that a Chinese princess once dropped a cocoon into hot water and it disintegrated into tiny threads. Scientists from many countries have been studying the issue of creating silk fabric, but they have never been able to solve it. The Chinese guarded their secret for a long time, until silkworm cocoons penetrated into other countries through secret routes.

Flax was cultivated in Ancient Egypt. Master weavers created the finest muslin, which was a favorite material for sewing clothes for wealthy nobles. The Crusades helped spread this wonderful fabric throughout the Mediterranean.
Ancient Greek fine linen– cotton fabric, carefully woven and enriched using natural dyes. The clothes of the ancient kings and their last decorations, which were found during excavations, were created from this fabric.
With the advent of manufactories, fabric ceased to be something in short supply. Materials for its production began to be grown everywhere. Only the Chinese carried the process of creating silk fabric through time with dignity. China and India are still famous for the quality and luxury of this material. At the beginning of the 20th century, scientists developed the first artificial fibers, which were used in textile production. They gave it special properties, for example, elasticity.
When you go to a store that sells fabrics, you can see a wide range of fabrics of different textures and colors.
Artificial floristry
Creating artificial flowers is a whole science. Simple flowers that can be used to decorate a girl’s dress do not require much time or materials. Even novice masters can handle them. But flowers that look as much like real ones as possible require painstaking work. They can be a great addition to a wedding dress or part of a bride's bouquet.
A duplicate bouquet created from fabric flowers will not wither or lose its appearance and will help preserve the memories of your happiest day.

To make these flowers you will need:
- Pattern. It is most often removed by disassembling the real flower into individual petals;
- Textile. For work, it is better to choose thin fabrics - satin, crepe de Chine, chiffon, silk, satin, organza;
- Bulki. This tool can be purchased at an arts and crafts store. Bulki are balls of different diameters attached to a handle. The spherical shape will help imitate the natural curves of a flower petal;
- Aniline dyes for fabric are needed to tint the petals, thereby giving them a natural look;
- Scissors, a spatula for curling the edge of the petal, an awl, glue, tweezers;
- Burner. Fabric subjected to heat treatment easily takes and retains its desired shape;
- Decorative elements – pistils, stamens;
- Rubber pad. The petal is pressed into it with a bubble and given its shape.
Now let's see how to make a flower. You may not need more of the tools listed above. The simplest flowers can be made from small circles of different diameters.
Note! The more layers of fabric you take while working, the more magnificent the finished product will be.
Prepare several circles from the fabric of your choice. The fabric needs to be cut correctly, this is done “on the bias”. To transfer patterns, do not use simple pencils, because... graphite smears and stains the material. Use a colored ballpoint pen. Carry out the cutting just below the outlined outline.

Using a torch or candle, slightly melt the edges of the workpieces. The process is shown in the photo.

Connect the resulting parts with thread.

You need to make stamens in the center of the flower. To do this, use purchased decorative elements or make them yourself.

A lush rose is made in the same way. It is based on circular petals of different diameters.

The petals are processed with bulk.

If you want to decorate the dress with a brooch, make a felt backing and attach the necessary accessories to it.

These simple flowers will be an excellent decoration for both wedding and everyday dresses.


Simple ideas
Let's move on to simpler, but no less beautiful fabric flowers. The process of their manufacture is so simple that it does not even require additional explanation. So, look carefully at the photo instructions.
Roses


Chamomiles and chrysanthemums


Peonies


