DIY Halloween crafts and decorations. Spectacular Halloween decorations or the best Halloween decor DIY Halloween at home: a ghost floating in the air
Halloween is not an official holiday in our country. However, the catchy outfits and stunning surroundings of this day cannot leave Russians indifferent. On the night of November 1, more and more people take to the streets dressed as monsters or ghosts, and the windows of houses and apartments are decorated with jack-o'-lanterns.
Stores offer a wide range of holiday paraphernalia, but it will be much more interesting (and cheaper) to make Halloween crafts with your own hands. Moreover, many of them do not require special materials or skills.
Decorating the room
For afterlife themed parties, you can create some themed items. DIY Halloween crafts can be created in just a few hours, and then can be used annually until you want to come up with something new.
Garland
A simple decoration in the form of a garland will immediately transform the room. It is enough to stretch a rope or ribbon from wall to wall and decorate it with homemade ghosts, and the atmosphere will immediately become ominous and mystical. To create a restless spirit, you will need a square of any white fabric. As a base for the head, crumple a sheet of paper, giving the lump a spherical shape. Place it in the center of a square of fabric, wrap it in it and tie it with a thread at the “neck”. That's all. All that remains is to draw a pair of eyes or an ominous face. There is an even simpler option - you can cut ghosts from a strip of paper after folding it like an accordion. Other Halloween symbols can also serve as the basis for the garland: pumpkins, bats or spiders.

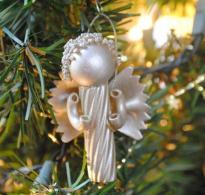
Ghost
Making separately hanging ghosts is also easy: you only need a small ball, a piece of gauze and PVA. The fabric is soaked in glue and wrung out. After which it is used to cover a ball lying on the neck of a jar or bottle. The structure must be stable. Pretty soon the gauze will dry to the shape you gave it. The jar or bottle is removed, and the finished ghost can be hung on a thin thread (fishing line) in the corner of the room. If there are several such figures, they look even more interesting.

Volumetric paper crafts for Halloween
You can make not only two-dimensional, but also three-dimensional crafts from paper. In particular, the pumpkin - the main symbol of Halloween - has several versions. The easiest way to make it is to glue it from paper. It's quick and even kids can do it.

Therefore, you can create these with children who already know how to use scissors or at least glue ready-made strips.
The pumpkin can be round or flat; for both options you will need orange and green colored paper.

The thickness of the strips, their length, shape and type of leaves - all this is at the discretion of the one who decided to create such crafts for Halloween. You can not only decorate the room with your own hands, but also create souvenirs for party guests - small pumpkin pendants.
Vampire bats
A must-know for those who make Halloween crafts themselves: it will always come in handy when it comes to everything mysterious and sinister. A flock of these bats immediately creates the atmosphere of an abandoned attic of an old house.

The easiest way to make a bat is from black paper or some similar material: cardboard, artificial leather, foamiran. It’s better to place vampires in a room in a group - it’s more believable.
Candles and candlesticks
Halloween-themed crafts can be not only purely decorative, but also functional. Thus, candles, decorated taking into account the peculiarities of the holiday, will become the main source of lighting on the most terrible night of the year. They can be painted with acrylic paints to depict a pumpkin, ghost or monster. And a candlestick can be easily made from a simple glass glass, painted in the same way.
pumpkin head
What would Halloween be without a pumpkin head grinning its unique smile? Anyone can make it from a real vegetable. To do this you will need a pumpkin, a knife and a little dexterity. The middle of the fruit is removed so that the remaining layer is 1.5-2 centimeters. Then the holes for the eyes, nose and mouth are carefully cut. Depending on your mood, your facial expression can be absolutely anything.

All that remains is to insert a light source inside your head, preferably a battery-powered flashlight.
Witch hat
While preparing crafts for Halloween, you can also create costume elements with your own hands. For example, a cap for a witch party or an evil sorceress costume. It consists of a flat ring (a circle with a hole in the middle, suitable for the size of the head) and a cone. Both can be easily cut out of thick cardboard, painted black and glued together. You can also create a witch's vehicle - a broom - from dry branches and a mop stick.
And something else…
What other paper crafts can you come up with for Halloween? Yes, any! Every item you come across can be turned into something Halloween-themed. Computer disks are modified into ghosts, shampoo bottles into vampires, and a trash can into Baba Yaga's mortar. All sorts of monsters are sewn, knitted, and sculpted from plasticine. By doing this seemingly useless task, you can find many new talents in yourself.
And creating crafts for Halloween with children is generally a real pleasure. They so joyfully create nightmare characters that in the process they themselves cease to be afraid of them.
On the night of October 31 to November 1, one of the oldest holidays in the world is celebrated - Halloween. This ancient Celtic celebration has an interesting history, original traditions and funny paraphernalia. The holiday strangely combines two traditions: the honoring of evil spirits and the worship of all saints.
In the USA, Europe and Canada, on this day it is customary to dress up in costumes of evil spirits, hold masquerades, light bonfires and build jack-o'-lanterns. It is not surprising that on the approaches to the famous holiday, many people have a question: how to make a pumpkin for Halloween? Today we will try to give you comprehensive instructions on how to make a Jack-O-Lantern.
Pumpkin is the main attribute of Halloween. Celebrants, as a rule, cut out ominous faces on the ripe fruit and insert a candle inside, constructing a kind of lantern. The habit of making vegetable lamps originated in Ireland and Great Britain. Celtic monks (Druids) made them from turnips, beets, rutabaga and used them to drive out evil spirits.
Initially, this ritual had nothing to do with Halloween, but in the 19th century, North America made it the main tradition of this holiday. Only instead of these vegetables they began to use pumpkin, since it symbolizes the harvest time. Americans named the jack-o-lantern the Jack-O-Lantern and made it the official symbol of Halloween.
Jack Lantern - who is he?
Before you start making a pumpkin for Halloween, you should familiarize yourself with the legend of Jack-O-Lantern, whose soul still wanders in search of peace.
According to legend, Jack led a miserable life as a lazy farmer, drunkard and thief. Fleeing once again with stolen goods from a crowd of angry peasants, he met the devil, who announced his hour of death. But Jack did not want to die and asked the messenger of hell to delay his death a little, offering in return to discredit the sinless peasants.
The insidious agreement was that the devil was supposed to turn into a gold coin with which Jack would pay for the stolen things. The coin will then disappear and the greedy villagers will start a fight to find out who stole it. The devil liked Jack's idea. He immediately turned himself into a gold coin and climbed into the thief's pocket.
But since the stolen item was a cross, the demon instantly lost his power. Jack released him on the condition that he would not take his soul to hell.

But when he died, his soul was not accepted either in heaven or in hell. Finding his way in the pitch darkness, Jack asked the devil for a lantern, to which he threw him several smoldering coals. The thief built a lamp from a pumpkin, put coals in it and began to wander between heaven and earth in search of peace. This is how the Jack Lantern appeared, commemorated annually on the night of November 1st.
How to Make a Halloween Pumpkin: Step-by-Step Guide
To make a Jack-O-Lantern you will need the following arsenal of available tools:
- pumpkin;
- cutting board;
- knives (one long, one short with a thin, sharp blade);
- spoon;
- felt-tip pen, marker or stencil with a face;
- candle.
Attention! Try to choose the freshest pumpkin. The skin of such a fruit has not yet hardened, which means it will be easier for you to carve patterns on it.
So that the lantern can not only fulfill its purpose on the day of the holiday, but also please the eye afterwards, check the pumpkin for the presence/absence of damage and rotten areas. At the same time, its shape and size do not matter.
Let's get started. The detailed process of making the lantern is shown in the photo.

Step 1. After choosing a pumpkin, cover the table with old newspapers or oilcloth, since carving the fruit is fraught with contamination.
Step 2. On the top of the pumpkin (around the stem), draw a circle or square with a marker to indicate the future hole. Make it large enough so that you can easily remove the pulp by hand or with a large spoon.
Step 3. Armed with a long kitchen knife, cut out the marked “cap”. This process must be performed at a slight angle so that you can cover the pumpkin with the cut off top, like a lid.
Step 4. Using a sharp-edged spoon, scoop out the pulp and seeds. Particularly work on the “front” part of the vegetable. The pulp in this area should be removed and leveled with a spoon until the wall thickness reaches two centimeters.
Step 5. Before making the Halloween pumpkin's face, use a felt-tip pen to draw the outlines of the eyes, nose, and mouth with a sinister smile on the skin. The eyes and nose are drawn in the form of three triangles, and the mouth is drawn in the shape of a crescent with two fangs.
Attention! Make the features of the face large and noticeable, otherwise they will be difficult to cut out.
If you have stocked up on a stencil, attach it to the fruit with tape or glue and transfer the design onto the pumpkin with dotted lines. To do this, you can use either a knife, a needle or a thin awl. After which the template can be removed.
Step 6. Taking a short knife with a thin blade in your hands, carefully draw it along the contour of the design. You need to cut slowly so as not to spoil the future lantern. The cut pieces can be pushed inside the pumpkin, or pry with a knife and pull forward. To ensure that the contours are smooth and clear, do not forget to scrape off the flesh protruding here and there with a knife.
To obtain a clear design, you can use special tools for carving vegetables.
Step 7. Having freed the pumpkin from the cut out pieces, fix the candle in its cavity and cover the fruit with a lid. The main character of Halloween, Jack-O-Lantern, is ready!
- To make the pattern last longer, cover its contours with Vaseline or vegetable oil.
- To keep your jack-o'-lantern fresh, soak it in water for a few hours.
- Make several small holes in the lid of the fruit so that hot air flows out without frying the pumpkin from the inside.
- Before use, place candles in the freezer for 2-3 hours - the lantern will burn longer.
- To ensure that your Jack-O-Lantern not only burns, but also spreads a fragrance into the air, rub the inside of it with crushed cinnamon or nutmeg.
Attention! A cleaned and carved pumpkin will retain its decent appearance only for 3-5 days, so it is necessary to build the lantern on the day or the day before the holiday.
You can admire a variety of pumpkin ideas in the photos presented.


Paper Halloween pumpkin
You can make original crafts for the holiday not only from vegetables, but also from paper. A paper pumpkin is suitable for home decoration and as a souvenir or gift for guests. Let's look at how to make a Halloween pumpkin from colored paper quickly and easily.
To do this you will need the following tools:
- A-4 sheet of orange color;
- green A-4 sheet;
- black A-4 sheet;
- threads with a needle;
- scissors;
- pencil and ruler;
- glue.
Step 1. Using a pencil and ruler, divide an orange sheet of paper into several thin strips, approximately 1.5-2 cm wide and 15-16 cm long. Cut the sheet with scissors. If you want to make your pumpkin unusual, use a tool with a raised edge. For one craft you need 18-20 paper strips.
Useful tips
Despite the fact that this holiday is not official in Russia and the CIS countries, people still like to celebrate it, because it is not only unusual, but also quite colorful and original.
Many people throw parties on Halloween. They can take place both in clubs, cafes and restaurants, and at home.
To beautifully decorate the room and prepare original Halloween crafts,We provide several interesting ideas, many of which you will definitely like.
DIY Halloween: Little Ghosts

You will need:
Styrofoam balls (found at an office supply store)
White cloth or gauze
Black pins
Thick thread.
1. Wrap each foam ball in fabric and tie a thick thread at the neck to secure the fabric.

2. Insert black pins to become eyes.

3. To hang the ghost, you can make a small loop of thread on the top of the head.
DIY Halloween Crafts: Spider Garland

You will need:
Thin brushes
Strong thread
Needle and thread or tape.

1. Prepare 4 pipe cleaners, gather them into a bunch and bend them in half.

2. Grasp the top of the head where the pipe cleaners fold, bend it slightly and twist the pipe cleaners to form the body of the spider.

3. Start straightening the spider's legs.

4. Using a thread and a needle or tape, attach the spider to the thread.

5. Make a few more spiders to create a larger garland.

DIY Halloween decor

For this project, you can use your imagination and use any objects (things, toys) to create an original Halloween corner.

In this case, a witch's locker was created. A large wooden box was used for this, but instead you can use a cardboard box to which you can attach several shelves and decorate with paints (gouache) and/or black duct tape (or duct tape).

As decorations you can add:
Toy skulls
Bats cut from black paper
Artificial web (buy in cans or make your own from threads)
Antique books and unwanted keys
Jars and cones, painted with gouache in the desired colors.

DIY Halloween at home: bloody candles

You will need:
Food parchment (baking paper)
White thick and thin candles
1 red candle
Pins and nails

1. To begin, cover your work surface with parchment paper and remove all stickers (if any) from the candles.
2. Light the red candle and get ready to drip red paraffin onto the thick white candle. You can insert pins and nails into the white candle in advance. Be careful, remember - paraffin is hot.
3. The same can be done with thin candles and then insert them into the candlestick.
How to make flying candles for Halloween


How to Decorate Your House for Halloween: Glow in the Dark Ghosts


Halloween Crafts: Hand


DIY Halloween Crafts: Cardboard Anti-Zombie Barricades


DIY Halloween Decorations: Eyes in the Dark


Halloween door decoration

How to make a big Halloween ghost with your own hands

You will need:
Transparent trash bags
Transparent wide and thin tape
Mannequin or volunteer
* you can use part of a mannequin (without the head) or something that has the shape of a torso, as well as a ball for the head.
Line (for hanging).
1. Torso
1.1. Place a large clear bag over the mannequin. If you have a volunteer as a mannequin, make holes in the bag for the head and arms and then put it on it.
1.2. Start wrapping thick tape around the bag. Pay special attention to the most intricate parts of the torso. Wrap around your waist, neck and shoulders. Add some tape to connect all the already wrapped parts - a couple of pieces from the neck to the shoulders and a couple from the waist to the neck.


* For more difficult places, you can use thin tape.
In the picture you can see strips of blue tape - this is so that you can better understand what to do next.
1.3. Continue wrapping the tape, varying from horizontal to vertical strips. The main thing is that the entire torso is covered.


1.4. To make the shape stronger, add another layer of tape. You can add a couple more layers if desired, but the more tape, the less transparent the ghost will be.
1.5. Using scissors (preferably with rounded ends), cut the shape from the back from the neck to the waist in a straight line. The dark tape in the picture shows exactly where this needs to be done.

1.6. Carefully remove the form from the mannequin and set it aside.
7. Nowhead.
If you don't have a head model, you can use a regular ball of the appropriate size.
*Under no circumstances use a real person for this.
7.1. Place a transparent bag over the mold.

7.2. Wrap thin tape around the neck to secure the bag at the bottom. And to secure the bag on top, wrap tape around it in the forehead area. If you are using balls, simply place some tape on the bottom and then start wrapping it around the entire ball.
Popular in Western countries, the Celtic holiday Halloween has lost its symbolism and has become an occasion to have fun and fool around by wearing costumes and making decorations in a Gothic and frightening style.
If you don’t know how to make an original Halloween costume at home, you can watch this. How to organize a party at home and what you need for this - read below.
What you need for Halloween
To make it immediately clear that today is not February 23, not March 8, guests and the host must dress appropriately. The scarier you look, the better. Welcome in black and pink tones, with streaks of blood. As for costumes, you have room to strive; the world knows many ghouls, boars, witches who have left their mark on history - Viy, Maria Stuart, Count Dracula, vampires and zombies.
Halloween decorations should be appropriate. Black bats, spiders, candles in candelabra and lots of cobwebs.
When organizing a holiday, it is worth thinking through the scenario, otherwise the party will become ordinary, including music and a lot of alcohol. It's worth saving a couple of ominous tunes. You can organize a competition for the scariest story and the best pumpkin. Or develop something like a quest where you need to find the mysterious will of a cannibal baron. You can tell fortunes on a book, hold a competition for the most terrible howl or dance of witches. Everything is in your hands, it is important that everyone is interested, and most importantly, scared.
How to decorate a room for Halloween
The traditional colors of the holiday are black and orange, so the paraphernalia should have corresponding shades. First, the site and the facade of the building are decorated. At this time of year, a lot of leaves fall to the ground. Do not burn it, but collect more of it to create the basis for decorative compositions.
Hang inflatable balloons covered with white sheets from the ceiling and paint the faces of makeshift ghosts.
If you need to decorate the entrance to your house for Halloween, place brooms. You can put a witch next to it, making it from scrap materials.
You can hang a wreath of hay or feathers painted black on the door. Don’t forget about the main attribute of the holiday – pumpkin. They can be purchased in huge quantities, made into candlesticks and placed throughout all living spaces.
Inflate black balloons, decorating them with ominous faces, wrap the chandelier with white threads, creating the illusion of a cobweb, and all glass surfaces can be painted at your discretion or have creepy inscriptions written on them. These Halloween decorations will please everyone.
If the house has a fireplace, then attention should be paid to it by placing gloomy stuffed animals, pictures, candles and jack-o-lanterns. You can cut out ghost figures from white cardboard and hang them in all places. Old books, chests, suitcases and paraphernalia of yesteryear will help decorate your home.
The main attribute of the holiday
The central symbol of the holiday, the pumpkin-lantern, appeared thanks to the Celts, who believed that these lanterns helped souls find their way to another world. Initially, turnips were used for this, but the Americans adapted zucchini, a type of pumpkin that was more accessible.
A pumpkin with a carved face and a candle placed inside is called a Jack O'Lantern. Allegedly, there lived a drunken blacksmith who was able to deceive the devil twice. Therefore, it began to act as a talisman against evil spirits, who, on the day from October 31 to November 1, leave their shelters and scare citizens.
Having creative abilities and extraordinary imagination, you can work with the zucchini so that the finished pumpkin head for Halloween will create a real sensation. First, it is better to draw a sketch on paper, and then transfer the drawing to the surface of the vegetable. Instead of trivial circles, square and round elements, you can cut out paintings, landscapes, and portraits. Crosses, stars and bats will be in theme. To win the fight for the best pumpkin, make a pumpkin monster that devours another fellow tribesman.
Victory will be in your hands if you make Jack the Pumpkin Snowman. All you need is a hat, an old shirt collar, a couple of buttons, markers, glue and a wine bottle cap. A Jack-o'-lantern can be made from paper by cutting it into strips and securing it on both sides, giving it the shape of a ball. The role of the leaves will be played by green velvet paper or thin fabric. Everyone will remember this Halloween pumpkin for a very long time!
What's a holiday without treats?
Everything about All Saints' Day should be spooky, including the food and cocktails. Boiled pasta with two eyes made from balls of Mozzarella cheese and two olives will look like a mummy. The same effect can be achieved by making sausages in the dough and leaving the ends peeking out so that you can put 2 eyes on them using mayonnaise.
Any cookies or crackers can be decorated according to the theme of the holiday using sauces, vegetables and fruits. You can decorate the sweet dessert with melted chocolate, drawing a spider web on it, and don’t forget to add gelatin worms.
Halloween food may be ordinary, but it needs to be decorated with a chilling twist. When baking cookies, try to shape them into bones. Whipped whites, when baked, will provide the product with an eerie natural appearance. Eggs can be boiled so that a mesh appears on their surface. And you can pass off grilled chicken wings as bat wings.
Drinks are given great importance. There are no recommendations for taste, but the color should fascinate with its eerie beauty, which means green absinthe, colorful liqueurs, and Grenadine syrup are suitable.
With the help of Baileys liqueur you can build brains in a glass, and dry ice will allow you to achieve the effect of a steaming glass. If you are freezing ice, put various plastic objects of the corresponding theme into the molds.
You can make an ice hand by filling a rubber glove with water and placing it in the freezer.
The same Grenadine and sugar can make a red rim on a glass, and a spider web, like on a cake, can be drawn on the glass walls with melted chocolate.
To implement the ideas you will need little money and time. The main thing is to approach it wisely and do it with friends. Good luck!
Every year there are more and more enthusiasts who are ready to put on scary rags for fun and decorate the house for Halloween. If you belong to them, here are some tips on how to decorate your home for the holiday very simply and quickly. In this master class I will show you how to make Halloween decorations with your own hands - 20 options with step-by-step photos on how to decorate your house scary beautifully!
How nice it is to dilute the gray autumn days with a bright, warm and tasty holiday. Even though this holiday came to us from Celtic countries and its roots go far into Western history, this does not prevent residents of other countries from treating it with warmth.
In Russia, the attitude towards Halloween still remains ambiguous. Some people consider it an incomprehensible and uninteresting event, which only young people are interested in, while others are excitedly waiting for it to have fun from the heart!
In any case, you should start preparing for this holiday in advance. In order for the party to turn out in the desired style, you should first of all take care of the decor of the rooms in which it will take place. Unfortunately, there are very few places in Russia where you can buy decent decorations for this holiday.
It is best to order them online, although chain stores often add themed accessories to their assortment before the holiday. But you can do everything yourself. So, let's make our house scary beautiful for Halloween!

The most popular decorations were:
- Pumpkins with cut out eyes
- Webs and spiders
- Ghosts and witches
- The bats
- Walking zombies and mummies
- Brooms, magic wands and other belongings
- Black cats in all forms
- Candles, dry leaves and other attributes of autumn.
A pumpkin walked around the garden... and ended up at a party
The main attribute of Halloween, of course, is the pumpkin, and it has many options to make your wildest fantasies come true: it can be cut out in the shape of a head with a terrifying smile and crooked teeth, dressed up with an elegant hat, painted with paints, wrapped in bright threads or covered with black lace stockings - who cares? that he is capable.
Pumpkins will ripen in the fields in October. And you can bring one such huge fruit into the house, extract all the pulp, cut out the scary face and put a candlestick inside.

In the dark, such a head will look very scary.

Jack-o'-lantern
Now you can make a real work of decorative art from a pumpkin. You can draw intricate shapes and patterns on it, either with paints or with a regular pen, to suit every taste. You can also cut beautiful lines across the entire surface or make fancy-shaped through holes so that the chiaroscuro from the candle creates beautiful patterns.
Pumpkins come in a variety of colors, shapes, and sizes. Large pumpkins should be placed near the entrance to the house. Smaller ones can be placed in rooms. They can be decorated with beads, sequins, rhinestones (suitable for light pumpkins) or fabric, bows and buttons (for bright orange pumpkins). On the surface you can depict drawings of spiders, cobwebs, bats, etc.
See how quickly and easily you can make a bat out of a pumpkin.


You can also cut out funny faces and scary pictures. Pumpkin can also be used as a flower vase. You can put asters, chrysanthemums and any other autumn flowers in it. Here you can also use rowan brushes and autumn leaves. Small pumpkins can be made into candlesticks. It will look very neat and cozy.
Perhaps because Halloween occurs in the fall, the pumpkin is the centerpiece of the day. This can be a decor item, a costume, or a children's craft. The main thing is to give a terrifying appearance, to scare everyone.
On our website we offer a craft option for young children, since they are the ones who love to sculpt from plasticine. You can make a pumpkin from an orange block, and not just one, but 3 pieces at once. You can also draw wonderful faces with plasticine and a toothpick on a soft surface. And also then make an unusual pyramid design, so to speak, a snowman out of pumpkins.
To create a Halloween decoration from plasticine, prepare:
- orange and black plasticine;
- toothpick
We will make the autumn fruits themselves from orange plasticine. Black will be needed for the eyes, and you can also put a black witch's cloak on the figure.

Divide the orange block of plasticine into 3 portions, but not equal, but gradually reducing the amount of mass in each of them. Mash each piece individually in your hands. Pumpkins will be made from them, they will become a kind of lumps for creating a snowman. The finished faces will need to be collected into a pyramid.

Roll the prepared pieces into balls. Then press down on top of each one with your palm to make the balls more flattened. It’s convenient to press out the veins with a toothpick.

Now turn each prepared part into a muzzle. It will not be just a vegetable, but a kind of specimen that forms one part of a single structure. The first largest pumpkin has a hard time, because it is located at the foot of the pyramid. Give her a nose, a distorted mouth and pits for the eyes.

Also, stick on a patch for decoration to show that the strongman pumpkin has burst more than once and has been sewn up to be repaired.

The second pumpkin is in the middle. It’s hard for her too, but not as much as the previous one. She is surprised and tries to gather her strength. Come up with a facial expression for her.

For decoration, make a black blot on the side.

Now comes the smallest and most cunning pumpkin, which completes the whole structure. She smiles and winks at everyone around her, her cheeks stand out, it’s not hard for her at all, because she doesn’t hold anyone on her.

When your pumpkin fantasy is ready, assemble your snowman. Glue one piece to another to size.

Mash a large amount of black plasticine in your hands, crush it with your fingers, pulling out a rectangular, very thin cake. From the prepared part we will make a long cloak with a cap. On one side, close the corners and smooth the seam with your fingers, pull out the sharp cap.

Glue the cape onto your head, or rather your face. The cap will be placed on the head and go down in the form of a long cape.


This witch is made from scrap materials - a plastic bottle, garbage bags and ribbons. The special thing about this one is that it can be used on Halloween to decorate your garden and yard.


The bat can be placed on any surface, or hung from the ceiling or door frame. The bigger, the better! They can be made from black bags, black tape, fabric and other materials. You can simply buy a toy at the store. You can place a web nearby and place it on a small spider. It is convenient to make a web from gauze or thin woolen threads. Most guests will definitely be impressed.
How to make a Halloween decoration - a bat from corks

These bats are made from cork and black paper.

To bring your finished mice to life, don't forget to glue on the eyes!

Black Cats
Black cats, as an ancient symbol of witchcraft, will be appropriate always and everywhere. These can be stickers, cut-outs, toys, figurines and even drawings.
How to make a black cat from plasticine - master class

You can make such a cat together with your children - they really like modeling from plasticine!


You should definitely think about mummies when you decorate your bathroom, kitchen and toilet. The element of surprise is important here. And since guests usually enter these rooms alone and relax, the effect will be very unexpected. Decorate your zombie costume with red spots, and you can even make a mummy out of toilet paper.
Items related to the magical world can be placed evenly throughout all rooms, giving preference to the hallway and living room. These can be brooms, magic wands, old hats, bowlers, etc. The picture will be perfectly complemented by candles of different colors and shapes, wreaths of dry colorful leaves, as well as red apples and oranges.

An owl is one of the attributes of Halloween; it can also be molded from plasticine.

Feel free to decorate any candlestick!
Burn, burn clearly, so that it doesn’t go out! Candlesticks and candles are no less important objects at a Halloween party than a pumpkin. As a basis, you can take an ordinary candlestick from the IKEA range, and then as your rich imagination will tell you.
You can paint it, wrap it in a white bandage and pour red paint on it for a bloody effect, scrape a pattern of cobwebs onto the wax, stick on blanks in the shape of flies or bats - it’s all very simple!

How could there be no festive table???
Halloween is the perfect holiday for those who break the rules, and this also applies to table decor. Only on Halloween you can find severed fingers or dead spiders among delicious dishes. For those who prefer a more classic style, we recommend using autumn natural decorations: yellowed leaves, rowan trees, chestnuts, hay, etc. Burning candles on the table will add a mystical atmosphere.

This is a master class on how to decorate a table for Halloween.

It doesn't take much time or effort to decorate your home for Halloween. The main thing is a little creativity, a good mood and company. Decorating a house in a terrifying style with a cheerful circle of friends is a good warm-up before a noisy party, isn't it?
There is probably a lot more that can be said about Halloween decorations, but these are the most spectacular and popular of all. Just add some food, music and good company and the party will be a success!