Make a cap with your own hands from cardboard. DIY cap options: made from paper, cardboard
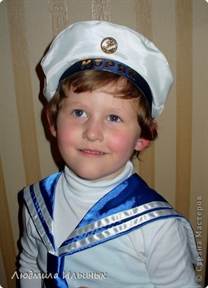
If your son is having a matinee in kindergarten, and you don’t know what suit to choose for him, dress him up as a sailor, this is a wonderful profession for men. And the most important sailor attribute (besides the vest) is, of course, the cap. But you don’t have to run to the store for an expensive sailor’s suit; you can make a wonderful outfit at home, literally in an evening, or a couple of evenings. If you have problems with time, but you definitely won’t have them with technology, because in this article you will be told how to make a white cap with your own hands.
Sailor costume
Becoming a sailor is the childhood dream of most boys, so let's try to make it come true, at least for a short time, and sew a suit for a boy in a nautical style. You will be offered a very detailed master class in the form of step-by-step instructions, everything is very simple, even the most inexperienced needlewoman can figure it out.
You will need:
- Crepe satin (white);
- Dublerin (the denser the better);
- Gabardine (blue);
- White satin ribbon, about five millimeters wide;
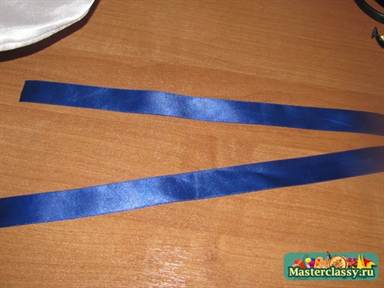
- Blue satin ribbon, about two centimeters wide;
- Applique for decoration (can be made in the form of an anchor, inscription, lifebuoy, etc.);
- Threads;
- Paper.
First you need to make a pattern for the product. To do this, you need to take measurements from the child’s head, then cut out a strip of paper (equal to the circumference of the head) five centimeters wide and roll it into a ring. And with the help of this circle, select the appropriate diameter of the future headdress.
The cap should not move, it should fit snugly, but at the same time, it should not put too much pressure on the child’s head.
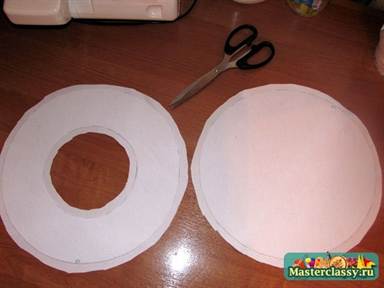
We cut off the strip, we have a pattern for the band. Now we’ll make a pattern for the most important part, to do this, measure the size of the strip obtained after fitting, designate this figure with the letter C, and calculate the internal radius using the formula: r = C/2π, and the outer radius using the formula: R = r+7cm. We build a pattern on a sheet of paper; the circles should have a common center. Cut out the resulting pattern.

Now we cut out all the parts from dublerin. The band needs to be cut ten centimeters wide so that a fold can be made. Look at the photo, these are the details you should get.

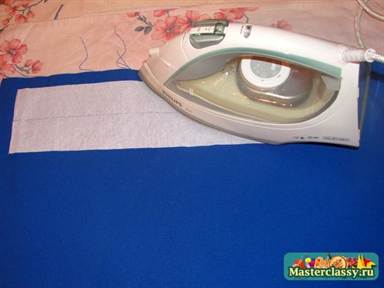
Now glue the dublerin onto the blue gabardine with an iron, making indents for adding (one centimeter at the top and bottom, and one and a half centimeters at the sides).
Well, now cut out the resulting band.


Glue the crown in the same way.

Cut both blanks, with increments of one centimeter.
Now return to the band, fold it in half with the dublerin material inside.

Steam the whole thing thoroughly using an iron.

Connect the elements of the product with pins, right sides facing inward.

Well, sew our future cap around the entire circumference.

We cut the increases along the entire outer circumference of the product.

Now turn the product inside out, straighten all the edges, you can even steam it, this part can be put aside for now.

Take the crown in your hands and place the extensions inside, securing with large seams, which can then be easily removed.

Repeat the same on the other side.

Now cut the increases in the inner circle.

Use a special disappearing fabric marker (available at any craft store) to mark the location to which the pin will be attached.

Now attach the crown to the band. Place the allowance that you made on the crown inside the band and sew with large stitches.
At the end of the band, we tuck the side extensions inside it and place this part on the unfilled extensions of its other end.
Make sure that the parts lie flat, you can try them on the child’s head again, and sew them in if necessary.

We sew the joint on the band with one machine stitch.

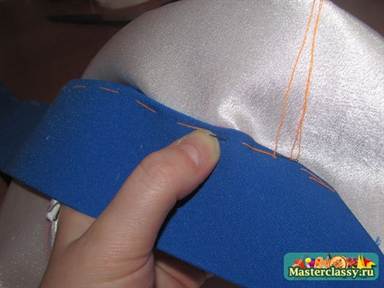
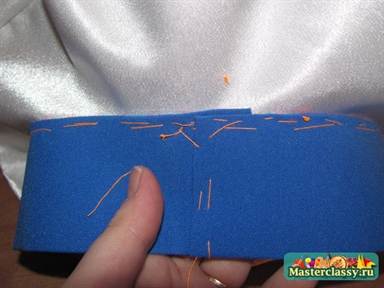
We attach these ribbons to the joint on the band, from the wrong side.

We sew our ribbons with a “needle forward” seam; we need to sew so that the needle does not extend to the front side of the product.


Now sew the decoration you have chosen (anchor, lifebuoy) with a hidden seam, place it exactly in the middle, follow the ribbons and make it exactly parallel to them.
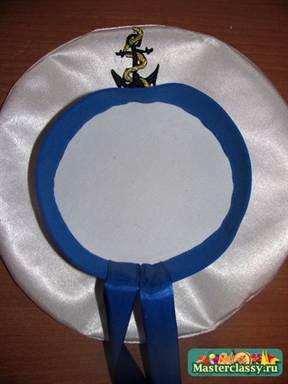
The cap is ready.

You can also make a collar for such a peakless cap, it will look very cute, and your boy will look original at the holiday.
You will probably be surprised if you find out that a cap can not only be sewn from fabric, but also made from paper or cardboard (if you want to make it more reliable), this is not at all difficult to do, even a child can cope with this task.

The pattern can be constructed in exactly the same way as for the cap in the first case (described above), our product will consist of the same three parts.
When the parts are ready, start connecting them. To begin, use regular paper glue to connect two circles, grease the part without a hole with glue and attach it to the part with a hole.
It’s very easy to make a side; glue the strip along the edges to make a ring. When all the parts are dry, connect them. That's all, as you can see, it's very easy. The finished cap can be decorated with some inscription or nautical symbol.

Video on the topic of the article
This is a completely simple way to please your son by making him a wonderful suit for the holiday. Watch the proposed video selection, from it you will learn how to make a cap out of paper using the popular origami technique and many other interesting ideas.
A real sailor cannot afford to be unkempt: his uniform is his face. At the same time, such a suit is convenient because it can be sewn with a reserve for next year. And, by the way, not only a boy, but also a girl can wear it - just instead of pants or shorts, you will need to sew a charming skirt or go even further in dressing up - the sailor girl will actually be a nimble sailor.
After it has been decided which parts of the costume need to be sewn:
- headdress;
- blouse;
- shorts;
- panties;
- skirt,
It's time to move on to measurements. There is no need to burden a set of clothes with unnecessary details if the seamstress’s skills are not very close. The basic necessities are quite enough for a child.
How to sew a cap?
The cap is sewn using a cardboard blank. The paper must be thick, otherwise it will be inconvenient to draw cutting lines. The optimal size of the head will be the diameter calculated from its volume plus 2-3 cm. You will need one large circle - the bottom of the cap, one stripe clasping the head, and one narrow circle connecting the stripe and the bottom. In addition, two ribbons will also come in handy. They can be cut from some light, cheerful material. In general, the good thing about a children’s sailor suit is that you can use your imagination to the maximum.
Other hats, not just a DIY cap
Sailors can wear more than just caps. A DIY sailor’s suit will also perfectly complement:
- a cap;
- hat;
- beret.
In finished form, they are not very different from each other. Additional calculations are carried out depending on what model of headdress should be obtained. You need to combine models taking into account the other parts of the kit. For example, a hat can be combined with a jacket or overcoat, and a beret can complement a thin blouse or even a T-shirt. It looks quite attractive in the photo.
Modern DIY sailor suit
If you can’t make friends with a needle, but you really want your own hand to be attached to your baby’s outfit, you can find a way out. For example, buy a striped T-shirt, dark trousers or shorts, sandals and a beret. Sewing ribbons to the latter is not at all difficult, and you will feel like a person who has sewn a suit yourself. In the video you can see a ready-made crocheted version of a sailor's costume.
The simplest sailor costume for children and adults
The baby will definitely be pleased if the parent, who made a New Year's or just a costume outfit for him, creates something similar for himself - at least a collar that can be used to decorate a shirt.

Parents should take into account the fact that children love detail, so the dad who sewed the guy will be rewarded with especially joyful emotions. A DIY sailor's suit is not a job. This is a fun time with your own child, because in terms of imagination, children can easily outshine adults.
A visor cap is a uniform cap without a visor. This is a form of headdress for sailors and soldiers, which has been used in the army since 1811. Today it is an interesting accessory that you can create yourself.
How to create a paper cap for a boy?
Instructions on how to make a cap out of paper.
For this you will need:
- white and blue fabric;
- satin ribbons of a similar color;
- adhesive-based fabric (dublerin);
- paper and scissors;
- anchor applique;
- threads with a needle.
To make a headdress pattern, you need to measure the circumference of your head. Put this value horizontally and vertically on paper at about 5-7 centimeters.
The resulting rectangle will be the band of the cap. Next, you need to cut the crown of the appropriate diameter.
Finished patterns are transferred to fabric with an adhesive base.
As a result, you should get 3 parts of the cap: the band, the top part and the crown. The dublerin band is glued to blue fabric, and the crown and upper part is glued to white fabric. The parts must be cut out, retreating 0.5 centimeters on all sides for an allowance. The band is folded in half and steamed with an iron. The part must be tight. When the fabric is soft, you can make several layers by folding them together.
The upper part needs to be basted and pinned, then sewn in the outer circle. To make the hat hold its shape better, the edges around the circumference on the wrong side can be made jagged. The product must be turned right side out and ironed.

The edges of the band need to be sewn up with thread, and small cuts should be made along the inner circumference. It is necessary to make sure that all seams match and there are no folds, and only then can the product be stitched.
The ribbons on the headdress are a mandatory element and are sewn on the wrong side behind the band. First, it is recommended to pin the ribbons with a pin, and then carefully stitch them around the perimeter so that the ribbon does not twist. All that remains is to place the anchor on the band, and the boy’s sea cap is ready.
How to make a beautiful cap for a girl
The manufacturing technology instructions for this headdress are no different from creating the male version, but there are still some distinctive points. For a women's cap, use a small dark fabric and satin ribbons. First, a pattern is made.

To do this, 1/4 of the height of the head circumference is laid out horizontally on paper, approximately 10-20 centimeters.
The lines are connected to form a wedge. Then, the pattern needs to be cut out and transferred to the fabric. Four wedges are cut from dark fabric and sewn together.
Then you should sew the band by sewing a narrow satin ribbon onto it. To prevent the paper headdress from falling off, you can sew ties on the sides.
How to make a cap out of cardboard
To create such a hat, you need to cut out a circle with a diameter of 3-4 centimeters from cardboard. Then, cut a strip 5 centimeters wide. This strip needs to be glued and small cuts made along its entire length. The finished cuts must be folded inward and glued to the circle. The finished headdress can be painted with black watercolors and golden ribbons glued to it.
Making a cap out of paper is not that difficult. This interesting accessory will look original at a costume party or children's party.
In the spring, the warmest and brightest holiday comes to us - Victory Day, on the eve of which cultural programs are held throughout the country - children's matinees, school assemblies, demonstrations and parades on the Red Square of the capital and in many large and small cities of Russia. At this time, the hats of soldiers of the Patriotic War, which are made at home and worn for festive events, are very relevant. Today we will tell you how to make a cap.
A capless cap is a sailor's headdress, which got its name due to the lack of a visor on the cap.
How to make a cap out of paper with your own hands - a simple option
It’s not difficult to make a cap, the main thing is to take the measurements correctly. For this purpose, use a measuring tape.
Taking measurements
Place the tape on the child's forehead 1.5 cm above the eyebrows. Wrap the tape measure around your head so that it passes along the frontal arches, above the ears, grabs the back of the head and joins into a ring. Write down the numbers - this is the size of the head circumference, mark it with the letter - L.
Making a pattern
The cap consists of several parts - a band, a crown, and a bottom. For work, prepare: a sheet of Whatman paper, a pencil, a ruler, and a compass.
- Lay a straight line on the sheet equal to the length of the circle. From its extreme points, lower down 5.5 cm segments - the height of the band. Construct a rectangle by connecting two perpendiculars with a straight line - you will get the future rim of your cap. Add 1 cm to the edge of the strip for gluing.
- For the upper part of the cap, consisting of a crown and a cap, create patterns by calculating the internal (r) and external (R) radius using the formulas: R = r + 7 cm, r = L/2n, where n = 3.14.
- According to the calculations, make two round blanks from paper for the top of the cap and one for the band.

Product assembly
- Apply glue to the edges of the large circle and attach the circle with the hole to it. Then make notches on the second one along the inside, bend them and glue them to the side.
- Attach a strip of soft cloth to the inside of the band to prevent it from rubbing your baby's forehead. Attach two blue ribbons to the back of the headdress, paint the crown black and decorate with the inscription.
Having completed the work, solemnly present your son with a new thing, let him hurry to sail on the waves of fun and relaxation.

How to make a cap out of paper with your own hands - an interesting option
To make a cap, take cardboard and proceed:
- Make a hat from colored cardboard in the same way as in the first case, only use tape or a stapler instead of glue. Be sure to glue a fabric strip inside the side;
- if you are working with ordinary cardboard, then duplicate the pattern cut out of it on fabric, and then cover the frame with material;
- Once the glue is dry, glue ribbons to the back of the hat and an anchor applique to the front.

How to make a cap out of paper with your own hands - an alternative option
All the options presented above make the headdresses bright and beautiful, but short-lived. Do you want your cap to look like a real one and last a long time? Make it from fabric. Prepare: needle, thread, scissors, pieces of white and blue fabric, doublerin (adhesive lining material).
- Cut out 3 parts according to your measurements: band, crown, bottom. Transfer all parts to dublerin and cut out. Attach a band of adhesive fabric to the blue fabric folded in half, and to the white fabric - the crown and bottom. Leave 1.5 cm allowances on all sides and cut out the pieces.

- Steam the visor along the fold with an iron, and sew the crown and upper part along the outer circle of the cap. Turn the workpiece inside out, iron it and baste it to the rim. Sew ribbons to the back of the band from the inside out, and pin an anchor badge to the front.

Make a cap and give your child the opportunity to be a real sailor and breathe in, even if only in play, the heroism and romance of distant wanderings.
If you decide to sew a cap for a boy, prepare the following materials and tools: a piece of white and blue fabric, white and blue satin ribbons, adhesive-based fabric, paper, thread, a needle and scissors.
First, measure the head circumference of the future owner of the cap. Place the resulting value on paper horizontally and 7-8 cm vertically. As a result, you will get a rectangle that will act as a frame for the product. After this, carefully cut out a crown of a similar diameter. Transfer the patterns to dublerin (that’s what adhesive fabric is called).
Take a band cut from dublerin and glue it to the blue fabric. For this you will need an iron. In a similar way, glue the upper part of the future cap and crown to the white fabric. Then cut out all the resulting parts. Just remember to leave a 1.5 cm seam allowance.
After this, fold the band into two equal parts and steam it with an iron. This part should become very dense. If your fabric is soft, try using multiple layers. True, then it will be quite difficult to sew it together. Secure the top and crown with pins or baste for security. Then they should be sewn together along the inside of the visor. Turn the product right side out and then iron it.
Make small cuts on the inside of the visor and baste the band to the crown. Inspect the product carefully. All seams must match. Smooth out existing wrinkles, if any. After this, the cap can be stitched.
Don’t forget to then sew the prepared satin ribbons to the back of the band from the wrong side. Initially, they should be pinned and then stitched. All that remains is to sew the nautical-themed appliqué onto the band and you can go try on the finished cap. By the way, a T-shirt made in the same nautical style will go perfectly with it.
As for the women's sailor cap, it is sewn much faster. You will need satin ribbons and a piece of dark blue fabric. By the way, the fabric can be soft, because such a headdress will still keep the required shape.
First make a pattern. To do this, set aside 18-20 cm vertically on paper and ¼ of the measured head circumference horizontally. Connect the lines so that you get a wedge. Cut out the pattern and transfer it to the fabric. You will need to cut 4 wedges from dark fabric and sew them together. Lining pieces may be needed if the fabric is very soft.
The band should be sewn in the same way as in the previous description. Then sew a narrow white satin ribbon onto it. Pin the band to the cap with a pin and carefully stitch it. Sew small ties to the sides of the headdress, otherwise it may fall off. Press the crown inwards a little so that a depression is formed around the circumference.
Every boy dreams of being a brave sailor as a child. Children are attracted to amazing sea voyages to distant and unprecedented countries, unforgettable adventures and, of course, beautiful uniforms. There is an opportunity to give your child such a small but amazing gift - to be in the role of a brave sailor, at least on New Year's holiday. You need to prepare a white shirt, blue shorts and a cap. Even if you can’t sew it from fabric, you can use durable paper. Interested in how to make a cap out of paper with your own hands? Very simple.
Measurements for making a cap
To make a sailor's headdress, you will need any thick paper; the ideal option would be a large sheet of whatman paper. First you need to measure the circumference of your child's head. In order for a sailor's cap made of paper to fit well on your head, you need to add another three centimeters to the resulting size. This will be needed for gluing and loose fitting. 
Cutting paper parts
When the head is measured, you need to draw out the details on whatman paper. The first detail is the side of the peakless cap. To make it, you need to draw a strip with the appropriate dimensions. The length should be equal to the circumference of the head plus three centimeters. The height of the strip is 5 centimeters. Next you need to draw the top. In order for a paper cap to fit your baby, you need to make the top voluminous. To do this we need to draw two circles. The radius of the small circle (and this will be the inner one): the head, divided by 0.6. Having received the radius of the circle, you need to draw the circle itself. Then you need to add 7 cm to the resulting value, that is, to the radius of the small circle. This will be the radius of the large (outer circle). Based on the obtained value, we also draw a second circle. When drawing, it must be taken into account that the center of both circles must be the same. The finished product should be a circle with a round hole in the center. It then needs to be cut out. Next you need to cut out another circle equal to the large one. Now it’s clear, from paper with your own hands. 
Assembly of parts
When three paper parts are already ready, you can start connecting. Initially, you need to glue two circles with PVA glue. To do this, coat the edges of the circle that has no holes with glue, and place the circle with the hole on top. The edges should fit tightly together, but be careful not to let the glue get on the main part. While the round parts are being glued together, you can work on the side. There is nothing complicated in this matter. It’s already clear how to make a cap out of paper. The ends of the strip must be glued. When the side is dry, you will need to attach the top to it. To do this, you need to make notches or cuts on the bottom circle (which has a hole). Using scissors along the entire radius, you need to cut pieces about 5 mm long every 3-4 cm. Then bend them and carefully glue them to the side. Let the workpiece dry. Now we know how to make a cap out of paper with your own hands. This will take a little time. 
Design of a cap
When the sailor's headdress is ready, you can begin to decorate it. You can paint the side with blue paint before gluing. It's certainly fast, but not very interesting. It is better to use a blue satin ribbon for this. You can glue it on or use a thread and a needle and carefully fasten it in several places. The stitches on the paper need to be small, and you need to pay attention that the needle is thin and sharp, otherwise you can tear the edge. It is also necessary to burn the ends of the ribbon with a match so that it does not unravel later. The length of the satin ribbon should be twenty centimeters larger than the size of the head circumference. After all, a sailor's ribbons flutter in the wind. Therefore, when attaching it to the side, you should start sewing not the very ends, but at a distance of ten centimeters from the end. Now it has become known how to make a cap out of paper with your own hands. Before putting a sailor's costume on your child, you must not forget about the paraphernalia. To do this, the front of the cap must be decorated with an anchor. It can be cut out of velvet paper, or you can purchase a ready-made applique. With a velvet anchor and a fluttering satin ribbon, your baby will feel like a real conqueror of the sea. You can also make a real nautical collar for the cap (you can also not sew it from fabric, but
If your son is expecting some kind of matinee in kindergarten, and you don’t know what suit to choose for the boy, a sailor’s suit can be an excellent choice, this is one of the most courageous professions, so let your son feel himself in this role. But what would a sailor be without a visor? That is why in this article we will offer you a detailed master class on how to make a cap out of paper. This is a very simple activity, but very exciting. You can also involve your child in this activity; children love to make things with their own hands.
First way
In fact, making such a cap is not at all difficult if you carefully read the instructions for completing the work and follow all the instructions. But it is very important to take your child's measurements correctly in order to make the correct pattern.
We take measurements.
Take a measuring tape and place it on your child's forehead just above the eyebrow line, wrap the tape around the child's head, going along the most prominent part of the back of the head. Remember the resulting numbers, or better yet, write them down and designate this number with the letter O (head circumference).
The cap should not put much pressure on the child’s head, but at the same time it should sit quite tightly on the head without flying off anywhere.
The cap consists of several parts - a band, a crown, and a bottom. For work, prepare: a sheet of Whatman paper, a pencil, a ruler, and a compass.
- Draw a straight line on a piece of Whatman paper that will be equal to the circumference of your child's head. Now, from the extreme points, draw down lines equal to 5.5 centimeters - this is the height of the band. Now you need to build a rectangle; to do this, connect two perpendicular ones with a straight line - you have the future rim of the visor. Add one centimeter to the edge of the strip so that you can later glue the product together.
- Now calculate using the formula R = r + 7 cm, r = O/2n, where n = 3.14 internal ® and external ® radii. We do this in order to calculate the upper part of the future cap.
- Using paper according to your calculations, make two round parts for the top of the cap and one for the band. What the pattern should look like is shown in the photo below.

We assemble the product.
- Apply glue to the edge of the large circle and glue another circle to it. Now on the second part, make cuts along the inside and use them to glue the side.
- Now glue a strip of soft fabric to the inside of the band; this is necessary so that your child’s skin does not become irritated and the product does not chafe.
- Glue two blue stripes to the back of the visor, paint the crown black, you can decorate it with some inscription. The cap for your boy is ready.

Alternative option

- Make the cap itself from colored cardboard in the same way as described in the first example, but instead of glue, use a stapler or adhesive tape (scotch tape) to connect the parts. Don't forget to sew the fabric strip inside the side.
- Make the same pattern as on the cardboard, but now on fabric. And cover the frame of the future cap with fabric material.
- Wait for the glue to dry and attach ribbons to the back of the product, and you can decorate the front with an anchor or lifebuoy.
Fast and interesting

You will need:
- Colored paper (blue, white and black);
- Glue;
- Oilcloth so as not to stain the table with glue;
- Stencils.

- Cut the blue paper into strips about two centimeters wide. The strip should be as long as the circumference of the head.

- Take black paper and cut out ribbons from it, cut out anchors using the stencils, and glue them to the ribbons.

- We make a circle from strips of blue paper and fix it with glue.

- Now cut out strips from white paper, choose the number yourself, but remember that six pieces will be enough for a child, and about eight will be needed for an adult. Bend them in half, this is necessary in order to determine the middle.

- Glue these strips together with crosses.

- We glue the resulting crosses together, thus obtaining a kind of star.

- Glue the resulting star to the blue circle, evenly distributing the edges around the circle.

- Now press the strips on top and smooth out the fold line.
A visor cap is a uniform cap without a visor. This is a form of headdress for sailors and soldiers, which has been used in the army since 1811. Today it is an interesting accessory that you can create yourself.
How to create a paper cap for a boy?
Instructions on how to make a cap out of paper.
For this you will need:
- white and blue fabric;
- satin ribbons of a similar color;
- adhesive-based fabric (dublerin);
- paper and scissors;
- anchor applique;
- threads with a needle.
To make a headdress pattern, you need to measure the circumference of your head. Put this value horizontally and vertically on paper at about 5-7 centimeters.
The resulting rectangle will be the band of the cap. Next, you need to cut the crown of the appropriate diameter.
Finished patterns are transferred to fabric with an adhesive base.
As a result, you should get 3 parts of the cap: the band, the top part and the crown. The dublerin band is glued to blue fabric, and the crown and upper part is glued to white fabric. The parts must be cut out, retreating 0.5 centimeters on all sides for an allowance. The band is folded in half and steamed with an iron. The part must be tight. When the fabric is soft, you can make several layers by folding them together.
The upper part needs to be basted and pinned, then sewn in the outer circle. To make the hat hold its shape better, the edges around the circumference on the wrong side can be made jagged. The product must be turned right side out and ironed.

The edges of the band need to be sewn up with thread, and small cuts should be made along the inner circumference. It is necessary to make sure that all seams match and there are no folds, and only then can the product be stitched.
The ribbons on the headdress are a mandatory element and are sewn on the wrong side behind the band. First, it is recommended to pin the ribbons with a pin, and then carefully stitch them around the perimeter so that the ribbon does not twist. All that remains is to place the anchor on the band, and the boy’s sea cap is ready.
How to make a beautiful cap for a girl
The manufacturing technology instructions for this headdress are no different from creating the male version, but there are still some distinctive points. For a women's cap, use a small dark fabric and satin ribbons. First, a pattern is made.

To do this, 1/4 of the height of the head circumference is laid out horizontally on paper, approximately 10-20 centimeters.
The lines are connected to form a wedge. Then, the pattern needs to be cut out and transferred to the fabric. Four wedges are cut from dark fabric and sewn together.
Then you should sew the band by sewing a narrow satin ribbon onto it. To prevent the paper headdress from falling off, you can sew ties on the sides.
How to make a cap out of cardboard
To create such a hat, you need to cut out a circle with a diameter of 3-4 centimeters from cardboard. Then, cut a strip 5 centimeters wide. This strip needs to be glued and small cuts made along its entire length. The finished cuts must be folded inward and glued to the circle. The finished headdress can be painted with black watercolors and golden ribbons glued to it.
Did your child get the role of a brave sailor in a school production? Or did he himself decide to show off his unusual costume at the matinee? Then you will have to worry about finding the appropriate suit. If there are no problems with a white shirt, dark trousers and a collar, then finding a cap is not so easy. But you don’t have to call everyone you know and waste time going to stores. In this master class you will learn how to sew a nautical cap for a child with your own hands in just a few hours. Shall we get started?
For the brave sailorWe will need:
- white and blue fabric;
- satin ribbons in white and blue;
- doublerin (adhesive-based fabric);
- anchor applique;
- paper;
- scissors;
- thread, needle.
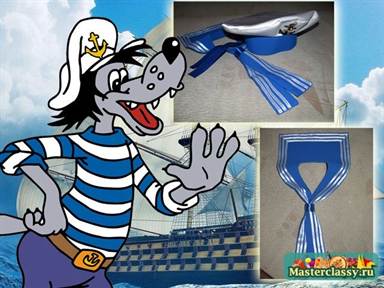
- To make a pattern for a visor for a sailor's suit, measure the child's head circumference. Put this value horizontally on paper and 6-7 centimeters vertically. The resulting rectangle will serve as the band of the cap. Then cut out the crown of the appropriate diameter. Transfer the patterns to the double sheet. You should have three parts (band, crown, top).
- Glue the dublerin band to the blue fabric with an iron, and glue the crown and upper part to the white fabric. Cut out all the details, leaving 1-1.5 centimeters of fabric on all sides for allowance.
- Bend the band in half and then steam it thoroughly with an iron. The part should be tight. If the fabric is soft, you can use several layers, but keep in mind that stitching will be very difficult. Baste the crown and upper part or fasten it with pins, and then sew the cap along the outer circumference.
- Tie the band around the edges with thread, and make small cuts on the inner circumference of the cap. Baste the band to the crown.
- A mandatory element is the ribbons on the cap, which are sewn to the band at the back (from the wrong side). First, pin them in place, and then stitch around the perimeter so that the ribbons do not twist when the child puts on this headdress.
- All that remains is to place an anchor on the band (optional), and the cap for your young sailor is ready! If you have some Navy logo ribbon, you can sew it to the front of the band.
 |
 |
 |
 |
 |
 |
 |
 |
A girl might also need a sailor costume. A women's cap is even easier to sew. All you need is a small piece of dark fabric and satin ribbons. This headdress can also be sewn from soft fabric, because it will keep its shape in any case.

First, make a pattern, which will require you to know the circumference of the head and the height of the cap. Set aside 1/4 of the circumference on the paper horizontally and 15-20 centimeters in height. Connect the lines to make a wedge. Cut out the pattern. Then transfer it to the fabric, cut 4 wedges from the dark fabric and sew them together. If the fabric is too soft, cut out the lining pieces.
 |
 |
 |
 |
Then sew the band (see description in steps 1-3) by sewing a narrow satin-colored ribbon onto it.